
Dental implant software
Dental implant software for planning and surgical guide design
GuideMia dental implant software takes a case from CBCT to a printed surgical guide in one project: segment bone and nerve, place implants against real bone density, design the guide, and export it to the printer or mill you already own.
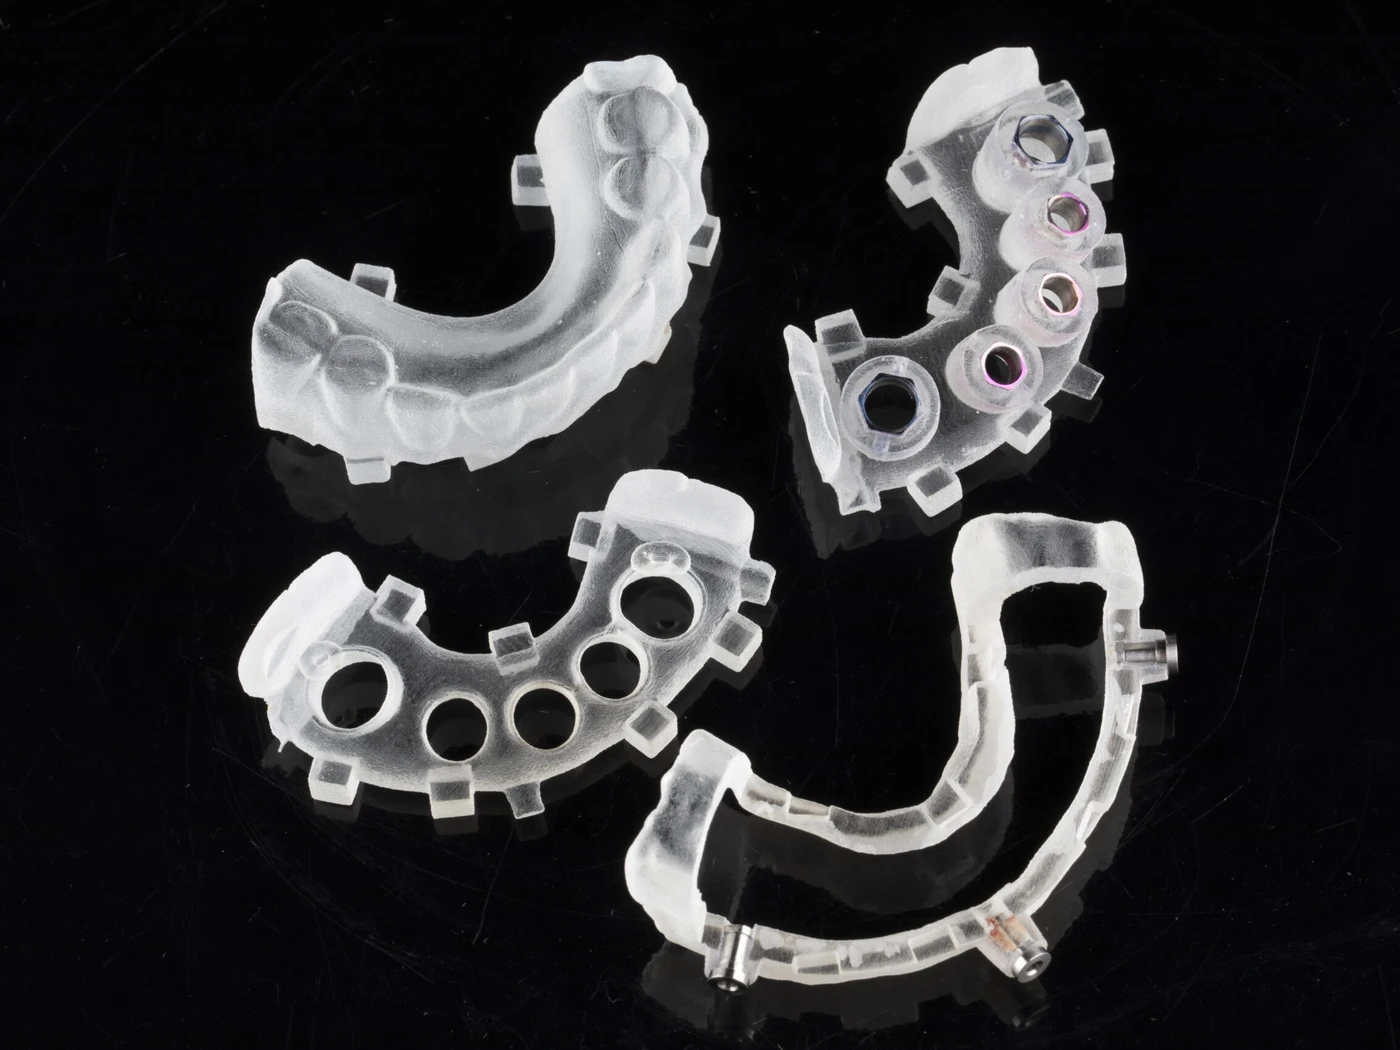
Dental implant software has two jobs. The first is diagnostic: read the CBCT, separate bone from soft tissue, trace the inferior alveolar nerve and the sinus floor, and register the intra-oral scan so the plan sits on the patient rather than on bone alone. The second is manufacturing: turn the approved implant positions into a surgical guide that seats, holds the sleeve at the planned angle and depth, and prints on ordinary equipment. GuideMia Implant Master, dental implant software since 2012, does both in the same project file, so a change to the plan is a change the guide sees.
It is also open. The dental implant software you choose should not decide which CBCT scanner, implant brand, surgical kit or printer you buy next. Implant Master reads DICOM from any CBCT system, carries an implant library that covers the major systems and accepts additions, designs guides for any guided kit, and exports STL that any printer or mill will take. GuideMia Implant Master is FDA 510(k) cleared (K121466) and is developed under an ISO 13485 certified quality system.
What the dental implant software does
- Reads DICOM from any CBCT system and registers intra-oral, desktop and facial scans to it
- Segments bone, roots and soft tissue, with AI segmentation of the CBCT volume, and traces the nerve canal
- Shows bone density at the implant site and checks distance to the nerve, the sinus and adjacent roots
- Places implants, abutments and scan bodies from an open library covering the major systems
- Designs tooth-borne, tissue-borne, bone-supported and bone-reduction guides, with sleeves matched to your surgical kit
- Exports STL for surgical guides, reduction guides, verification jigs and restoration models to any printer or mill
What you bring in
Dental implant software is only as open as the data it will accept. These are the inputs a case can be built from, in whatever combination the case justifies.
- CBCT (DICOM)
- Any scanner, any field of view. The volume is loaded at the resolution it was reconstructed at rather than downsampled to make the display quicker.
- Intraoral scan
- STL, PLY or OBJ from any intraoral scanner. Full arch preferred, with 3 to 5 mm of margin beyond the tooth surfaces.
- Stone model scan
- A desktop optical scan of the cast, for practices that do not scan chairside and for arches where scatter would spoil the CBCT surface.
- Radiographic guide or denture
- For fully edentulous cases. The radio-opaque markers are found, extracted and matched automatically, including in scans full of artefact.
- Face scan
- Where the smile line and the facial midline decide the setup, the face comes into the same coordinate system as the bone.
- Antagonist and bite
- The opposing arch and the bite registration, so occlusion is part of the plan instead of a surprise at delivery.
- Diagnostic and prosthetic CAD models
- A virtual tooth setup, a wax-up, a denture design or a planned prosthesis, brought in as a model and planned against.
- Implant, abutment, sleeve and kit libraries
- Every implant brand, every guided kit, every sleeve. Nothing in the data decides which hardware you buy next.
A guided implant case, step by step
The same five steps whether the case is a single premolar or a full-arch immediate load.
01
Import
Load the CBCT DICOM folder and the intra-oral or model scan. Radiographic markers and scan bodies are recognised automatically and the scan registers to the bone.
02
Segment
Bone, teeth and soft tissue come out as separate models. Trace the inferior alveolar nerve and mark the sinus floor; where the AI is unsure, correct it on the slice.
03
Place
Position each implant against the bone density map with the planned restoration in view. Check angulation, depth and the safety distance to nerve and roots.
04
Design
Choose the guide type, set the sleeve for your kit, add windows and retention, and let the dental implant software build the guide body around the seated surfaces.
05
Make
Export the guide as STL and print or mill it in-house. Share the plan through the free Implant Planner or a Cympha Studio link for the surgeon's sign-off.
Two seats, one case
Not everyone who looks at a plan needs to design one. The software comes as a design seat and a free planner, and both open the same case.
Design
GuideMia Implant Master
The seat that produces the work: CBCT processing, registration, implant planning, guide design and export for manufacture. FDA 510(k) cleared under K121466.
Planner — free
GuideMia Implant Planner
Loads CBCT and scan data, traces the nerve, places implants and measures. Enough to plan a case and show it to a patient or a referrer. Guide design and export stay in Implant Master.
Automatic segmentation
Segmenting a CBCT by hand is the slowest part of a case and the part most likely to be rushed. GuideMia separates the jaw, the teeth and the roots automatically, and what comes out is a model you plan against rather than a picture you look at.
- Jaws, individual teeth and roots separated without hand-tracing slices
- Low-density bone reconstructed properly, so a bone-supported guide can be built against the real surface
- Scatter from crowns, posts and existing implants handled rather than ignored
- Virtual soft-tissue peeling, which is what makes printing a bone model possible
Cases it is built for
Every picture below is a real case planned in GuideMia Implant Master, shown as it appeared in the software.
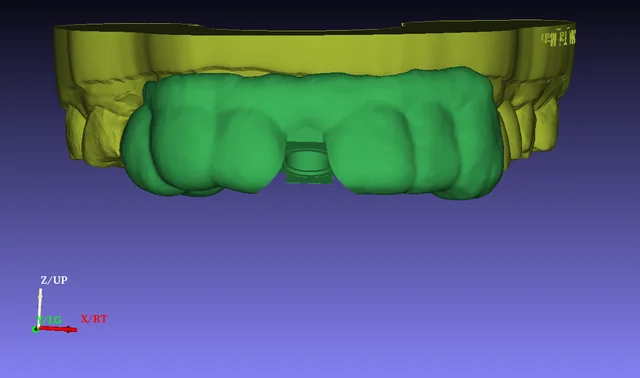
Single tooth, tooth-supported
A guide carried by the teeth on either side of the gap. The everyday case, and the one that should take minutes.
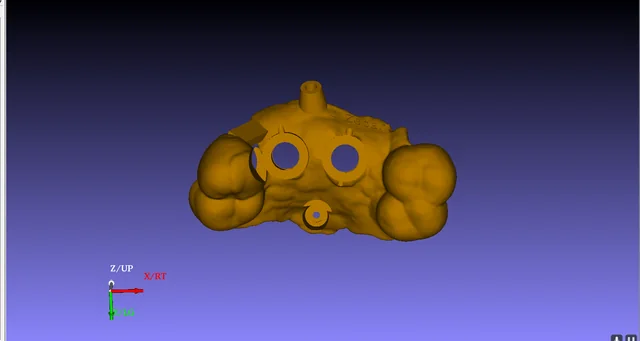
Partial arch, tooth-supported
Several units, with enough remaining dentition to carry the guide. Support comes from the teeth, so the guide seats one way and only one way.
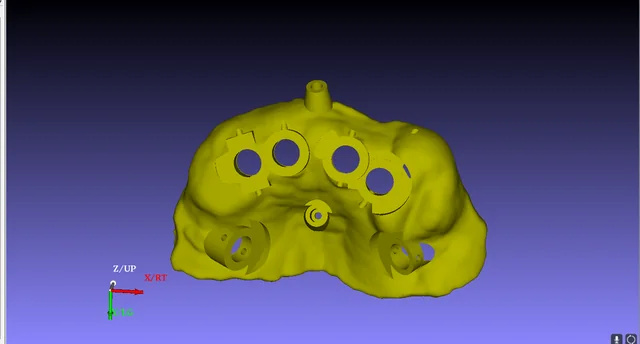
Mucosa-supported second guide
The anterior implants went in first. This second guide is carried by those implants and by the mucosa, and places the rest.
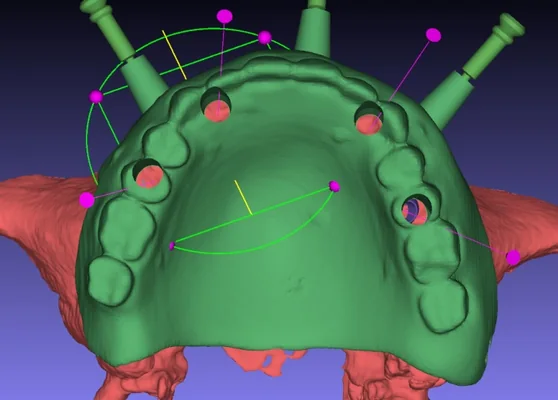
Prosthetically driven full arch
The restoration is set up virtually first and the implants follow it — here they emerge through the planned teeth for a screw-retained prosthesis.
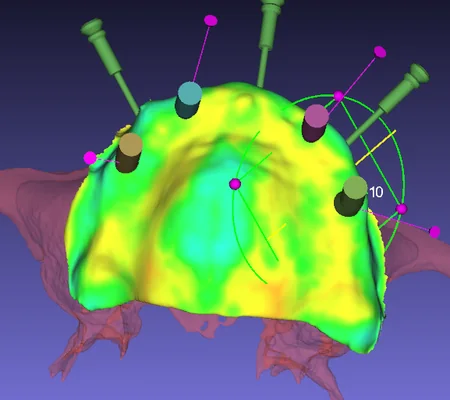
Fully edentulous maxilla
Implants and anchor pins planned against a modelled gingival surface, on a maxilla with no teeth left to support anything.
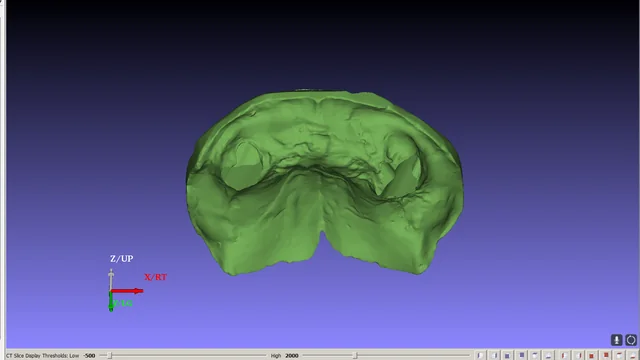
Planning the extraction
The remaining teeth removed virtually, so the guide and the implants are planned against the ridge that will actually be there.
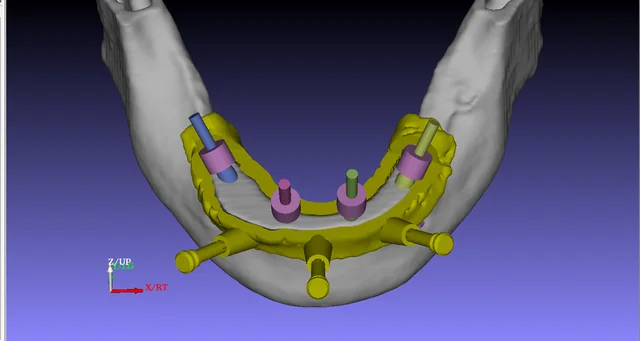
Bone reduction
Mark the bone to remove, preview the ridge that is left, then design the reduction guide against it. This is the capability most labs arrive for.
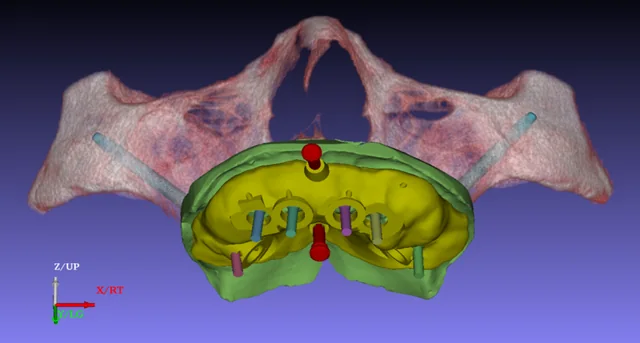
Zygomatic implants
Long implants anchored in the zygomatic bone, planned across the maxillary sinus, where a millimetre of drift is not recoverable.
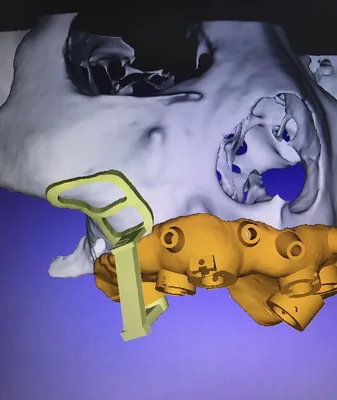
Lateral-window sinus lift
A guide for the antrostomy itself: the outline of the window, fixed before the handpiece touches bone.
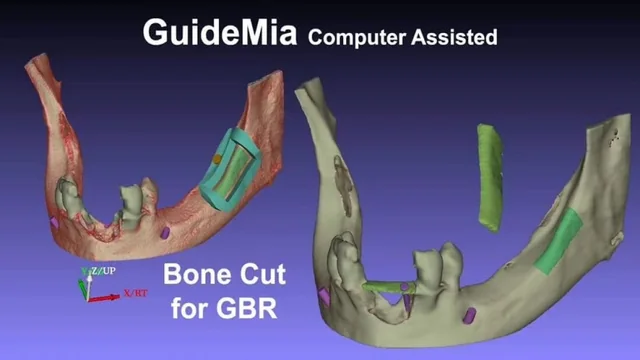
Bone harvesting for grafting
Where the block comes from and where it goes, cut to shape by a guide rather than by eye.
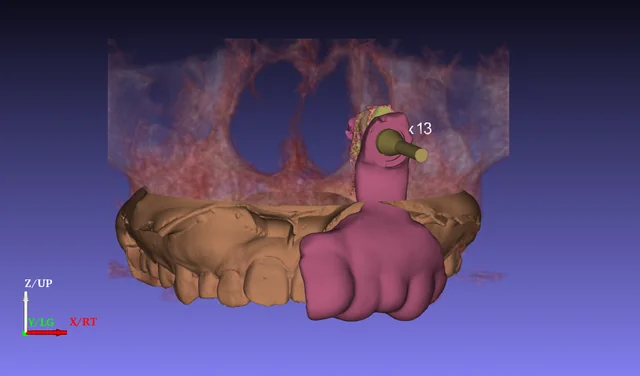
Impacted tooth
Locating a tooth nobody can see, and handing the surgeon the direction of approach that reaches it.
Around the software
Scanning protocols
What to capture and how to send it. Five protocols cover partially and fully edentulous cases, with and without a radiographic guide, with the CBCT parameters and the marker checklist spelled out.
Read the protocolsThe guided surgical kit
The GuideMia Universal Kit guides the drill by its own cylinder turning directly in the sleeve, removing one interface and the tolerance that comes with it. Every other guided kit is supported as well.
How the kit affects accuracyShowing the case to someone else
A plan that only opens on the workstation that made it is a plan nobody else can check. Cympha Studio opens the same case in a browser, so a referring surgeon, a lab or a patient sees what you see from a link.
- Opens STL, PLY and OBJ with nothing to install
- Step through a treatment plan online
- Send a link instead of a file
Cympha is a separate product from a partner company. Accounts, billing and support for it are handled by Cympha, not GuideMia.
Who uses GuideMia dental implant software
Dental clinics
Plan chairside on the patient's own CBCT, show the case in 3D, and either design the guide yourself or send the plan to a lab. The free Implant Planner covers planning, measuring and presenting; Implant Master adds guide design and export.
Dental labs and guide services
Design every guide type for every clinic you serve, on whichever kits and printers are already on the floor. Pay-per-case export keeps cost in line with volume while a guide service is starting out.
Group practices and DSOs
Standardise implant planning across sites on one dental implant software platform, keep the plan and the guide in one record, and route design work to the lab of your choice.
The products
One free planner and one paid design tool, both on Windows, both reading the same project file — plus local CBCT segmentation that feeds either.
GuideMia Implant Master
The full dental implant software: CBCT segmentation, implant placement, every guide type including bone-reduction and zygoma, and STL export for manufacture. Subscribe monthly or annually, or pay per case.
GuideMia Implant Planner
Load CBCT and scans, trace the nerve, place implants and take measurements. Enough to plan a case, present it to a patient or review a lab's plan. No card, no expiry.
CBCT Segmentation
Automatic per-tooth STLs, maxilla, mandible and nerve from a DICOM folder, on your own PC. Feeds Implant Master or any other CAD tool.
Questions about dental implant software
- Which CBCT systems does the dental implant software support?
- All of them. Implant Master reads standard DICOM, so the scanner brand does not matter. The same applies to intra-oral, desktop and facial scanners: STL, PLY and OBJ all import.
- Does it include surgical guide design, or only planning?
- Both, in one project. Planning and guide design share a file, so a change to an implant position is a change the guide reflects immediately — there is no export and re-import between the two.
- Can I use my own implant brand and surgical kit?
- Yes. The implant library covers the major systems, and components you use that are not in it can be added. Guide sleeves are set to match the guided kit you actually own.
- Is the software cleared for clinical use?
- GuideMia Implant Master is FDA 510(k) cleared under K121466 and is developed under an ISO 13485 certified quality system.
- How do I try the dental implant software?
- Download the free GuideMia Implant Planner and open one of your own cases. When you need guide design and export, every Implant Master plan starts with a 15-day free trial.
Cookbooks on this topic
Also from GuideMia
See what Implant Master costs
CBCT planning, guide design and export for manufacture, on the hardware you already run. A free Implant Planner is on the product page if you want to open a case first.