
Everything you will plan from step 6 onwards is applied to an individual tooth. A movement, an attachment, an IPR value, a step in the staging table — each of them names a tooth and acts on it. So far no tooth exists. Each arch is one solid model with a boundary drawn on it, and the boundary is a line on a surface, not a cut through it.
Segmentation is where GuideMia makes the cut: it lifts each crown off the arch, gives it a number, works out which way it is oriented, and builds a root under it. It runs once for the upper jaw and once for the lower, and it takes seven presses of the Happy Button to get through both. This step walks all seven, because they are not repetitions of one another — the two jaws are interleaved, and the presses in between do work you should look at before allowing the next one.
This is also the third and last point at which GuideMia offers to take over. Pressing AlignerBot here runs the segmentation, the planning and the design without stopping. Read the step even if you intend to use it; when a case does need a hand, these are the tools.
Giving the difficult teeth a direction
The Happy Button reads "Tooth Medisaldistal Direction" [sic], and the view swings underneath the upper arch so you are looking at its occlusal surfaces.
Click the Happy Button to segment teeth. At this moment, you can use AlignerBot to complete planning and design.
The step is named after work that is optional, and the message does not mention it, so it is easy to press straight through. Before you do, consider whether this case wants any axes drawn. GuideMia's own rule for when it matters:
This is optional if the tooth arrangement is not too bad. For the teeth that are way off the arch curve, or the teeth that have very big rotation angle, it is recommended to draw the mesial distal axis in order to assure the segmentation will succeed.
Turn on "Specify mesialdistal axis", pick the tooth in the tooth-number control beside it, and draw across the tooth the way you would place a distance measurement. The direction is not the same for the two jaws: on the upper jaw draw from the patient's right to left, and on the lower jaw from left to right. The axis you draw is the direction GuideMia works from, so check which jaw you are on before you draw.
The tooth-number control shows both numbering schemes at once — the Universal number, with the FDI number in brackets — and it arrives preset to tooth 2 (FDI 17), the upper right second molar, ready for you to work forward along the arch. Leave it alone and GuideMia segments every tooth and assigns the numbers itself.
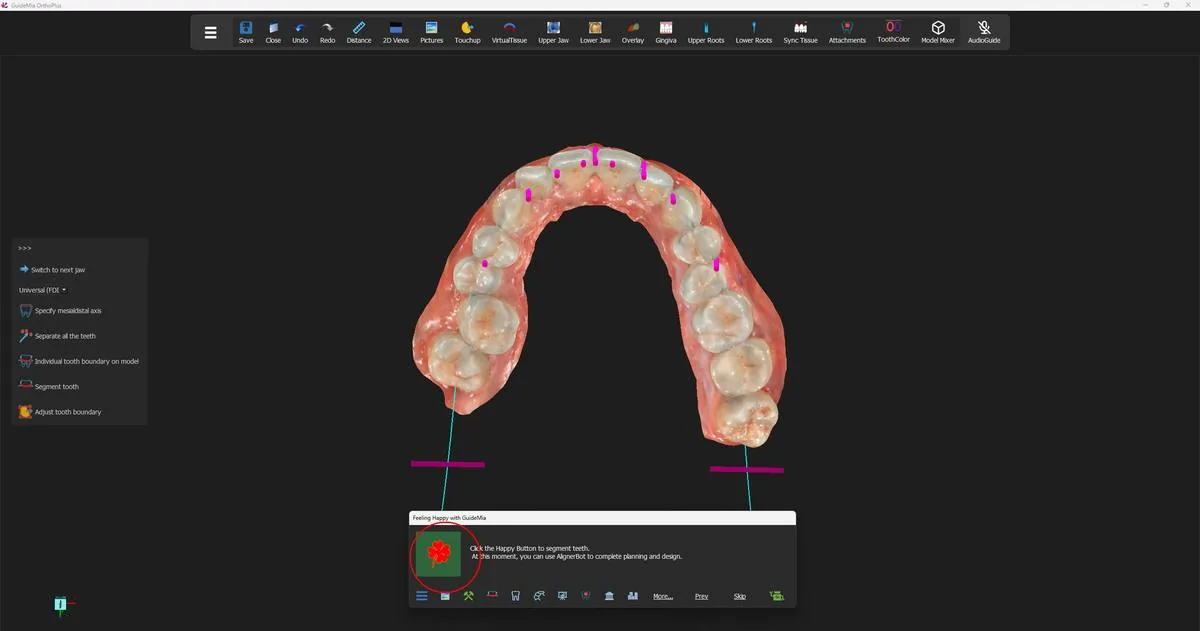 The upper arch from below, ready for mesial-distal axes; the short magenta bars are the axes already recognised.
This case needs none drawn. Press.
Separating the teeth
The Happy Button now reads Tooth Segmentation:
After defining mesialdistal axis (or skip the step), click the Happy Button to finish segmentation.
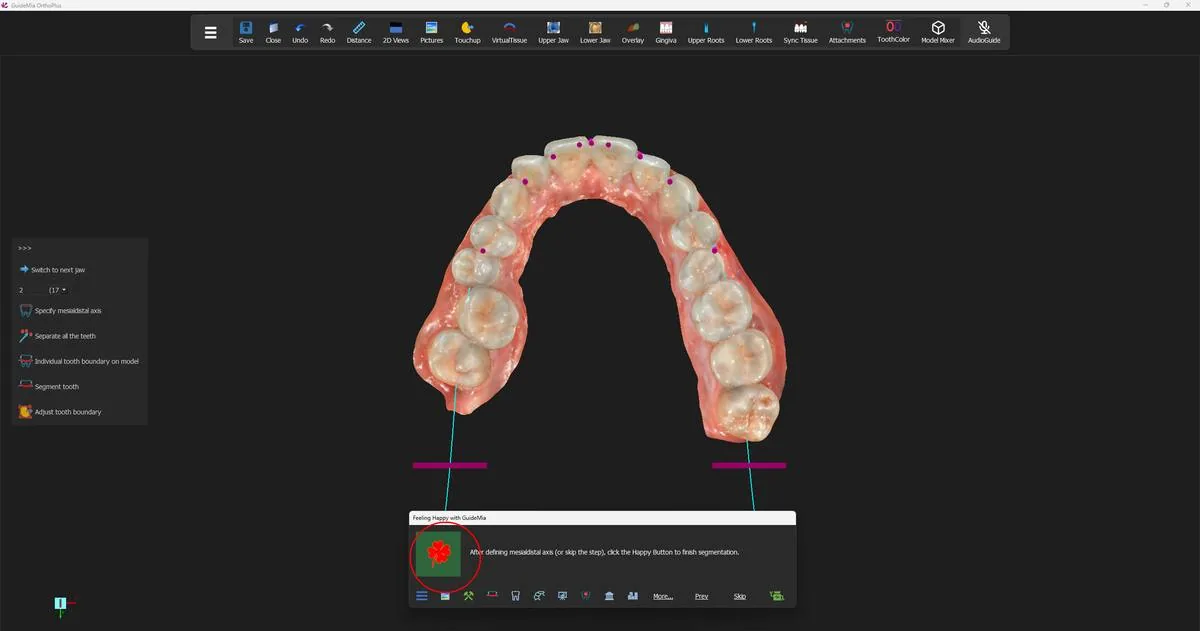 The tooth-number control preset to tooth 2 (FDI 17), with the segmentation about to run on the upper arch.
Pressing runs the whole upper arch at once. It is not a single sweep across the teeth: GuideMia "may try a couple of times for each tooth, and may run more than one rounds for the entire jaw". Give it time to finish rather than assuming it has stalled. It is also the step most sensitive to scan quality — which is why step 3 asked you to write down the teeth the scan-quality report named.
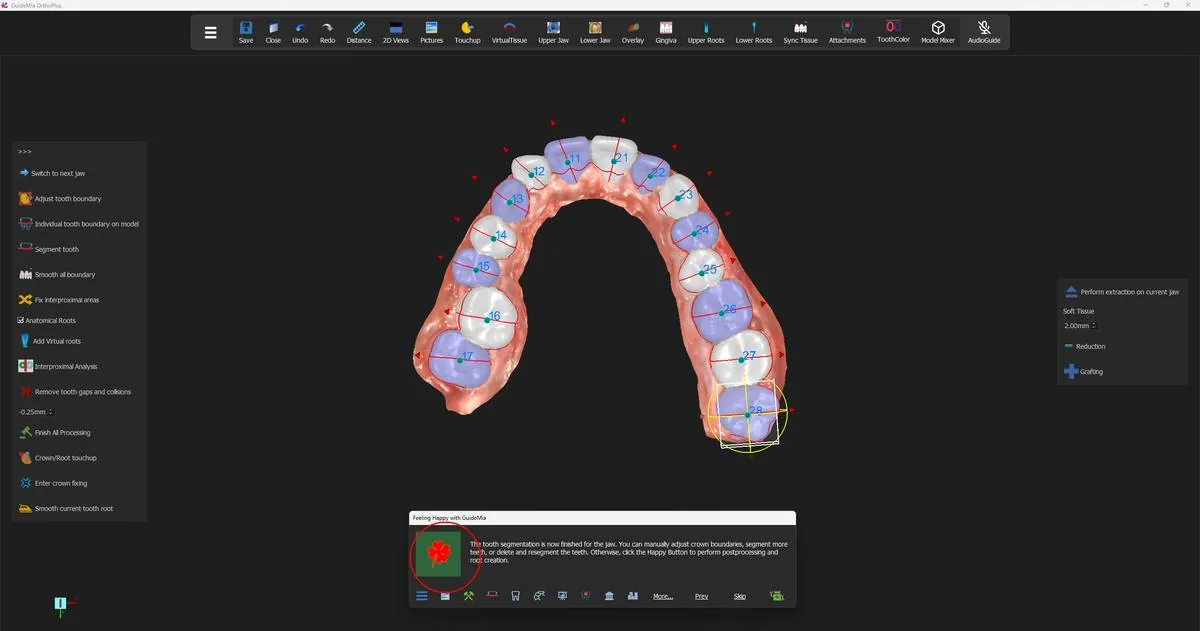 The upper arch separated: each crown its own object, numbered, in alternating colours, with its axes drawn on it.
The teeth come back in alternating shades. That is "Toggle teeth", on by default, and it exists so that two adjacent boundaries can be told apart at a glance. The numbers drawn on the crowns are FDI.
Judging the result
The Happy Button now reads Post Processing, and this is the decision point of the step:
The tooth segmentation is now finished for the jaw. You can manually adjust crown boundaries, segment more teeth, or delete and resegment the teeth. Otherwise, click the Happy Button to perform postprocessing and root creation.
Look at the arch before you accept it. Three faults are worth hunting for: a tooth that was not segmented at all, a boundary that has cut up into the gingiva or across into the neighbour, and a crown that has come away carrying part of something else. Turn the model and look from the buccal and the lingual as well as from the occlusal — a boundary that looks right from above is often the one that has run too far down an interproximal space.
If something is wrong, fix it here. It is far cheaper than discovering it during movement planning:
- Adjust a boundary that is close but wrong with "Adjust tooth boundary". It works on the current tooth, and it undoes any post-processing on that tooth first, shows you the boundary on an unsegmented surface, and lets you drag it.
- Segment a tooth that was missed with "Individual tooth boundary on model", then "Segment tooth". Pick four to six points around the crown boundary, and do not pick any points in the interproximal area — that is the whole technique.
- Delete and re-segment a tooth that came out badly enough that adjusting it is not worth the effort. Right-click the tooth model and delete it.
- Fix a wrong number with "Change tooth number". Misnumbering happens on crowded arches and on arches with missing teeth, and it is worth checking now rather than reading a plan later that refers to the wrong tooth.
To work on a particular tooth you have to make it current, and the way you do that is not discoverable: in the assembly window, middle-click the blue arrow on the tooth. Five different tools depend on that gesture.
What the press actually does
Pressing at Post Processing runs three operations over the jaw and then a fourth. The three are boundary smoothing, tooth-orientation identification and interproximal repair — the same three the panel's "Fix all for the jaw" runs, each of which can also be run alone. The fourth is root creation.
Roots, and what they are on this case. GuideMia builds a body under every crown. With CBCT data it can follow the real anatomy. This case has no CBCT and no apical centres, so what it builds instead comes "according to statistical data" — a plausible root shape rather than a measured one. A checkbox, "Anatomical Roots", decides whether you get root-shaped bodies at all or simple pontics; its guidance is to turn it on when emerging teeth are present.
That distinction earns its place here because of what roots are used for. From step 6 onwards the roots are what collision detection reads when it decides whether two teeth will interfere as they travel. On a case built from statistics rather than radiographs, an interference warning is a well-informed estimate. Read it as one.
Checking the orientations
The Happy Button now reads Tooth Orientation:
Adjust tooth orientations (or skip the step), then click the Happy Button to continue.
Do not skip this one lightly. GuideMia is more insistent about tooth orientation than about anything else in the segmentation stage, and the reason is downstream:
It is very important to make sure the tooth orientations match the actual teeth. […] If the tooth orientation is not set right, the automatic tooth setup can place the tooth in a wrong position. Even though you can adjust tooth positions, the collision checking or IPR control can still produce less satisfactory results.
Each tooth carries three axes, drawn on it and colour-coded: blue is the vertical long axis, red is the buccal direction, green is mesial-distal. What you are checking is that the long axis really does run up the tooth and that the buccal arrow really does point buccally — on a rotated or tipped tooth those are exactly what the automatic pass is most likely to get wrong.
To correct one, middle-click its blue arrow. A bounding box appears around the tooth, and rotating the box rotates the orientation. If roots have already been created you will see the root update as you turn it.
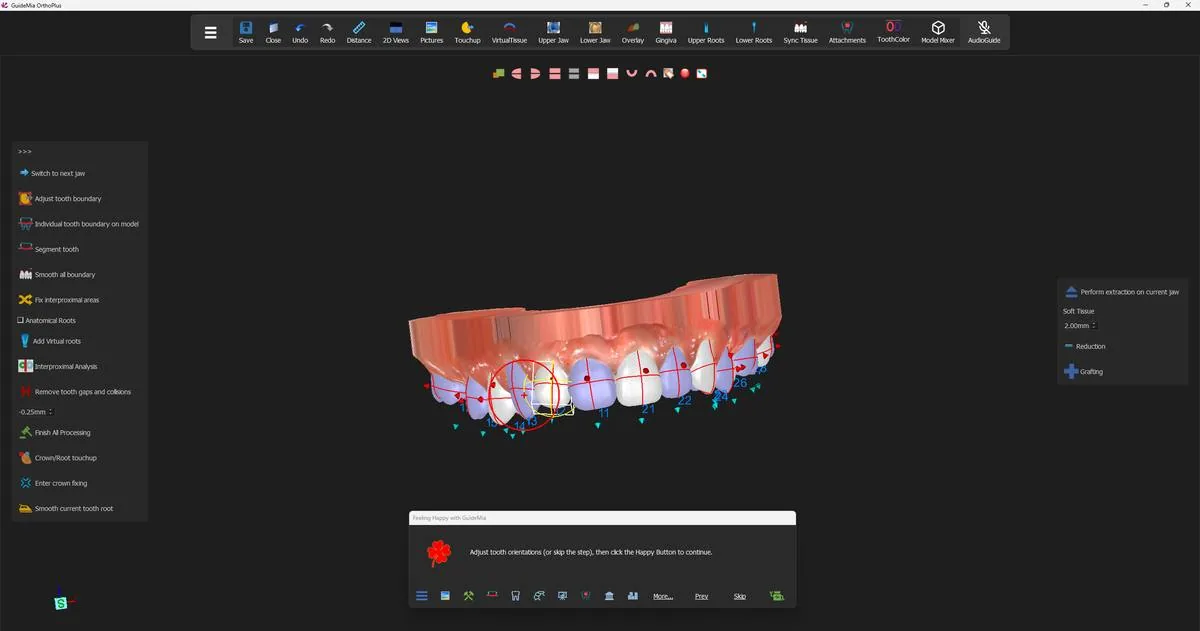 Middle-clicking the blue arrow on a tooth brings up its bounding box and rotation handle.
One property of the automatic orientation pass is worth knowing, because it looks like a bug and is not: "It can be a progressive process, so each time this function is executed, the resulted tooth orientations can be different." Running "Optimize tooth orientations" a second time and getting a different answer is expected behaviour, and "run it again" is a legitimate remedy when one tooth has come out wrong.
The lower jaw
Pressing at Tooth Orientation switches to the lower jaw and presets the tooth-number control to tooth 18 (FDI 37). The Happy Button reads Tooth Boundary:
Generate the tooth boundaries and segment the teeth for lower jaw.
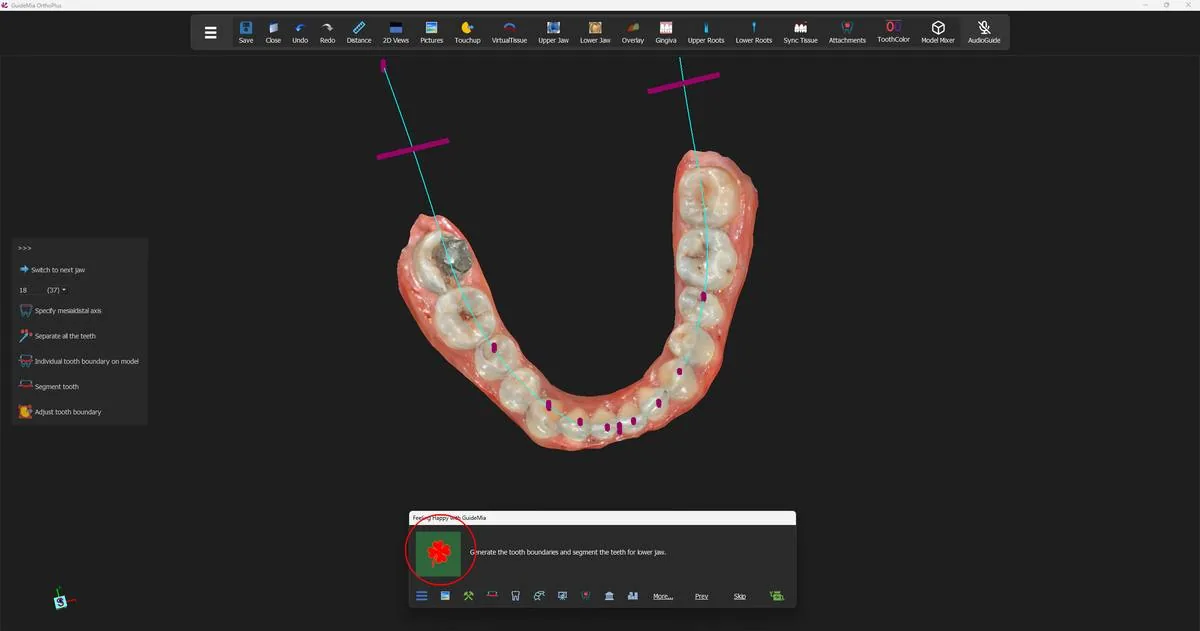 The lower arch, with the tooth-number control now at tooth 18 (FDI 37) and the arch curve and its range bars visible.
This press does for the lower arch what two presses did for the upper: it generates the boundaries and separates the teeth in one go. If you want to draw mesial-distal axes on the lower jaw, draw them before this press, and remember that the direction reverses — left to right on the lower jaw.
The Happy Button then reads Post Processing again, with the same message as before, and the same decision to make. GuideMia's guidance for this jaw is the most practical repair advice anywhere in the product, and it applies equally to the upper:
It is recommended that you inspect all the tooth boundaries and make necessary adjustment. Just right click on the tooth model you want to adjust, and select the menu item. If some teeth are not segmented, you can look for the manual segmentation tool on the left side of the workflow panel. […] Also please check the tooth numbers shown on the teeth. For some complex cases, the tooth numbers may not be right. If so, you can click right mouse button over a tooth, and select to change tooth number.
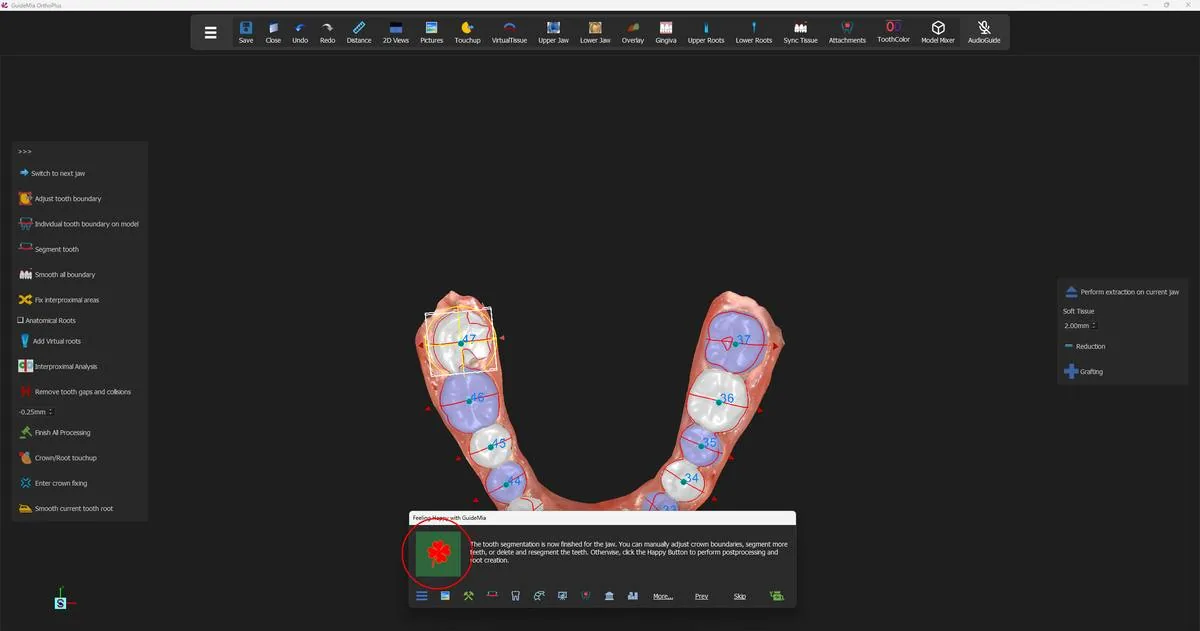 The lower arch segmented and numbered, ready for post-processing and roots.
Press, and the lower jaw is smoothed, oriented, interproximally repaired and given its roots, exactly as the upper was.
Calibrating the contacts
One press remains, and it exists because of how scanners behave rather than how GuideMia behaves. The Happy Button reads Interproximal Gap Calibration:
Because scan data always have issues with their interproximal area, you may want to review and calibrate the gaps or collisions between teeth. The interproximal analysis and process functions can be found in the workflow post segmentation page. If you click the Happy Button, GuideMia will automatically process all the models for you by adjusting all the gaps and collisions.
Where two teeth touch, a scanner cannot see into the contact and has to interpolate. What it leaves is either a small gap or a slight overlap, and neither is real. The blunt version is in the panel tool's own text: "the tooth segmentation represents the scan data but not the actual teeth." An overlap that is an artefact of scanning will be read by the movement simulation as a collision to be resolved, and a gap that is an artefact will be read as space that is available.
Press, and GuideMia works through both arches and closes them out — on this path it adjusts gaps and collisions within 0.2 mm. If you would rather inspect the contacts yourself first, "Interproximal Analysis" on the workflow panel turns the gap-and-collision display on, and right-clicking an individual interproximal area lets you calibrate just that contact instead of all of them.
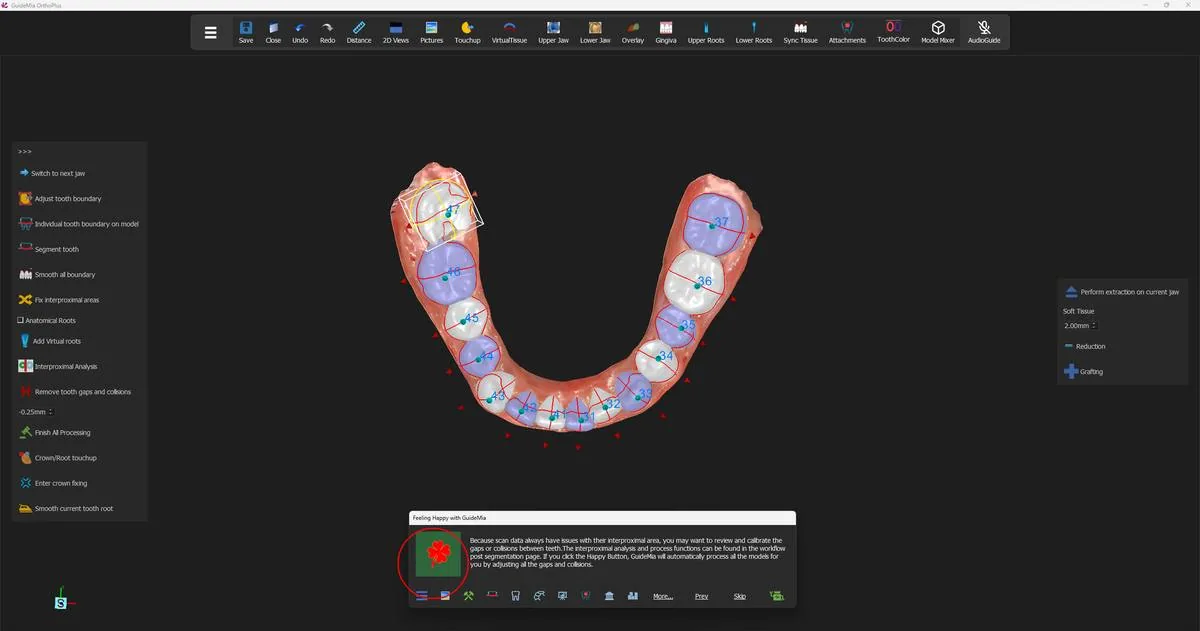 The calibration step, with both arches fully segmented, numbered and rooted.
Where you are now
Both arches are separated into individual, numbered teeth. Each tooth has its three axes, a root beneath it, smoothed boundaries and repaired interproximal surfaces, and the contacts between teeth have been calibrated away from the scanner's guesses. Every tooth is now an object that can be moved, and the treatment plan begins in the next step.
The workflow panel's tooth-segmentation page carries far more than the seven presses used. The demo touched almost none of it; a difficult case will need much of it.
Segmentation
| Control | What it is for |
|---|---|
| "Switch to next jaw" | Move segmentation to the other arch |
| "Tooth ID" and its dropdown | Segment one numbered tooth instead of the whole arch |
| "Specify mesialdistal axis" | Draw a tooth's direction to help a difficult segmentation |
| "Clear all" | Remove every drawn axis and start again; delete any segmented teeth first |
| "Preview tooth boundaries" | Show the likely crown divisions without segmenting — not a promise of the final result |
| "Toggle teeth" | Alternating boundary colours; on by default |
| "Separate all the teeth" | Run the segmentation for the current jaw — what the Happy Button presses |
| "Individual tooth boundary on model" | Draw one tooth's boundary by hand: four to six points, none interproximal |
| "Segment tooth" | Cut that tooth out along the drawn boundary |
| "Adjust tooth boundary" | Re-open and drag the boundary of the current tooth |
| "Change tooth number" | Correct a number GuideMia assigned wrongly |
| "Bolton Index:" | A readout of the Bolton analysis |
Post processing
| Control | What it is for |
|---|---|
| "Fix all for the jaw" | Smooth all boundaries, identify orientations and fix interproximal areas in one press |
| "Smooth all boundary" | Boundary smoothing alone — possible to repeat, not recommended |
| "Optimize tooth orientations" | Re-identify the axes; legitimately gives a different answer each run |
| "Fix interproximal areas" | Fill patches into open interproximal surfaces; extends a little further each run |
| "Add Virtual roots" | Build the roots on their own |
| "Anatomical Roots" | Root shapes or simple pontics; turn on when emerging teeth are present |
| "Interproximal Analysis" | Turn the gap-and-collision display on and off |
| "Remove tooth gaps and collisions" | Calibrate every contact on the jaw; right-click a contact to do one at a time |
| "Finish All Processing" | Run the whole finishing sequence in one go; it greys itself out afterwards |
| "Crown/Root touchup" | Push or pull the surface of the current crown or root |
| "Enter crown fixing" | Edit the crown boundary against the root; undoes interproximal fixing and smoothing |
| "Smooth current tooth root" | Smooth one root a little per press |
| "Reduction" / "Grafting" and the millimetre box | Reduce or add gum around the current tooth, for excessive gum, recession or emerging teeth |
| "Perform extraction on current jaw" | Carry out planned extractions; tick the teeth on the tooth-extraction dock first |
| "Cancel extraction on current jaw" | Undo the extractions on this jaw |
The soft-tissue tools carry a safety statement in their own help text, and it is worth repeating verbatim: "It is advised that the final aligners need to be checked against the actual jaw model if you use the functions in this section to modify the teeth and tissue models."