
The automatic alignment gave you a target: a position for every tooth, arrived at from arch curves and treatment-plan parameters. It is a good target and it is not a finished one, because the software optimised an arch, not a patient. This step is where you take that target apart tooth by tooth and put it back together as something you would treat.
Two kinds of work happen here and they feed each other. Moving teeth is the obvious one — a canine that wants a degree less rotation, an incisor that should sit half a millimetre further lingual. Interproximal reduction is the other, and it is what makes the moving possible: teeth cannot occupy the same space, so every position you improve on one tooth has to be paid for in space taken from somewhere along the arch.
You will go round that loop several times. Move, settle the contacts, look at what the settling did, move again. The software is explicit that this is normal — its own description of the IPR tool says "Some times this may need to be done multiple times" — and a case that needs three passes is not a case that has gone wrong.
Nothing here is staged yet. Everything you do in this step changes the final positions. Steps come in step 9.
Entering tooth setup
Press the Happy Button at "Click the Happy Button to enter tooth setup." The panel opens on "Planning Final Positions" and presses "Start/End Planning" for you. That toggle is what puts the case into manual setup, and its own description is the definitive account of how a tooth is moved:
"When this button is pressed down, the system will show upper and lower teeth in different rendering options, and all the other models except upper tissue model will be hidden. You can click on any tooth and adjust the tooth positions."
You can press it again at any time to step out, and again to step back in. Everything in this step is done with it down.
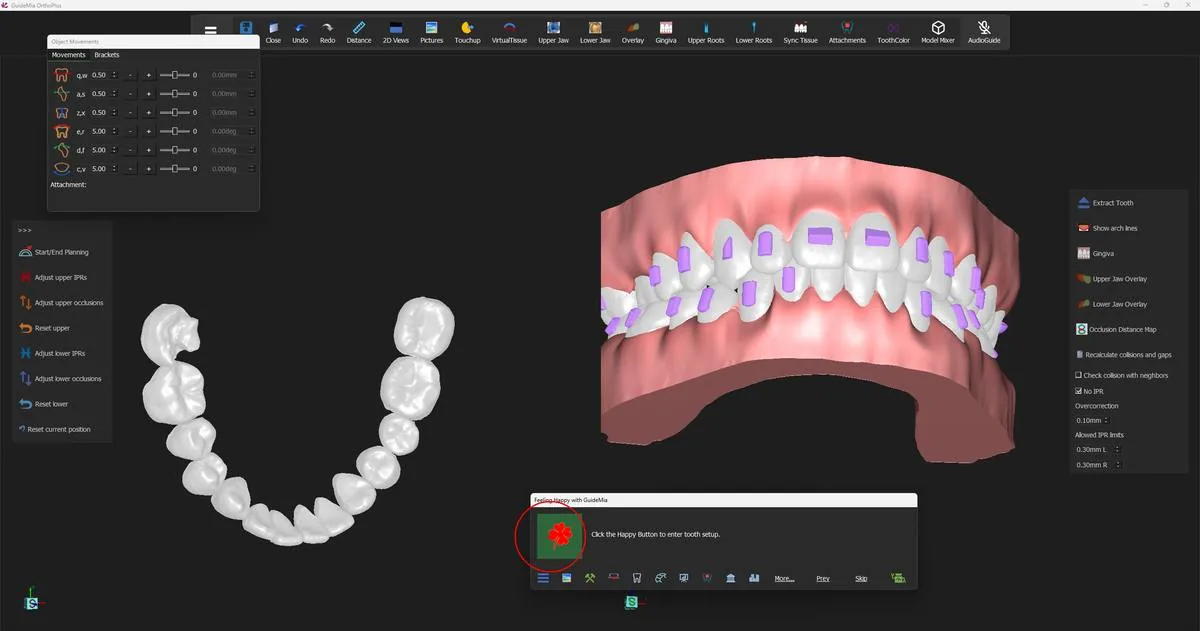 The case in tooth setup: the working object window on the left, the assembly on the right, and the manual tools on the panel.
Three ways to move a tooth
GuideMia offers the same movement three ways, and which you reach for depends on whether you know the number you want.
The placement widget. Click a tooth and handles appear around it. Drag them to translate and rotate. The middle mouse button drags the tooth directly. This is the fastest way to explore — you can see immediately whether a tooth has anywhere to go.
The "Object Movements" dock. Six sliders, one per axis: mesial-distal, buccal-lingual, extrusion-intrusion, rotation about the tooth's vertical axis, torque about its mesial-distal axis, and tipping. Each has a step-size field and a pair of "+" and "-" buttons that nudge by that step. Beside them, six read-only fields report the resulting movement in millimetres and degrees — so the dock is both the control and the readout. When you drag a slider, GuideMia may reorient the object window so you can see the movement you are making.
This is the one to use when you want 0.5 mm buccal, not a bit buccal.
The keyboard. For left-handed working the first three columns of alphabet keys move and rotate; for right-handed working the arrow keys plus Page Up and Page Down. The dock labels each axis with its key pair — "q,w", "a,s", "d,f", "z,x", "c,v", "e,r" — so the mapping is on screen while you learn it.
Moving several teeth at once. Control or Shift with the left mouse button selects multiple teeth. The placement widget only appears on one of them, but it moves all of them.
Linked mode is a different thing and the two are easy to confuse. "Upper Linked Mode" and "Lower Linked Mode" make the neighbours of the tooth you move follow it by a gradually reducing amount:
"When a selected tooth is moved, the adjacent teeth will move in the same way but by gradually reduced amount. This is called linked mode. This is not same as to move multiple teeth together. If you are selecting and moving multiple teeth together, make sure you turn off the linked mode."
Linked mode is for smoothing a segment. Multi-select is for moving a block rigidly. Running both at once gives you neither.
Watching the contacts while you work
Tick "Check collision with neighbors" before you start moving anything.
"This option will turn on and off the visual feedbacks of collisions and gaps between adjacent teeth."
With it on, every interproximal contact along the arch carries a number, live, updating as you move. A positive value in red is a collision — the two crowns overlap by that many millimetres. A negative value in green is a gap. Zero is a clean contact.
This changes how manual adjustment feels. You are not moving a tooth and hoping; you are watching the two numbers either side of it as you go, and you can see the moment a rotation you like starts costing 0.3 mm of overlap on the distal.
"Recalculate collisions and gaps" forces the numbers to refresh if you have been working somewhere that did not trigger an update.
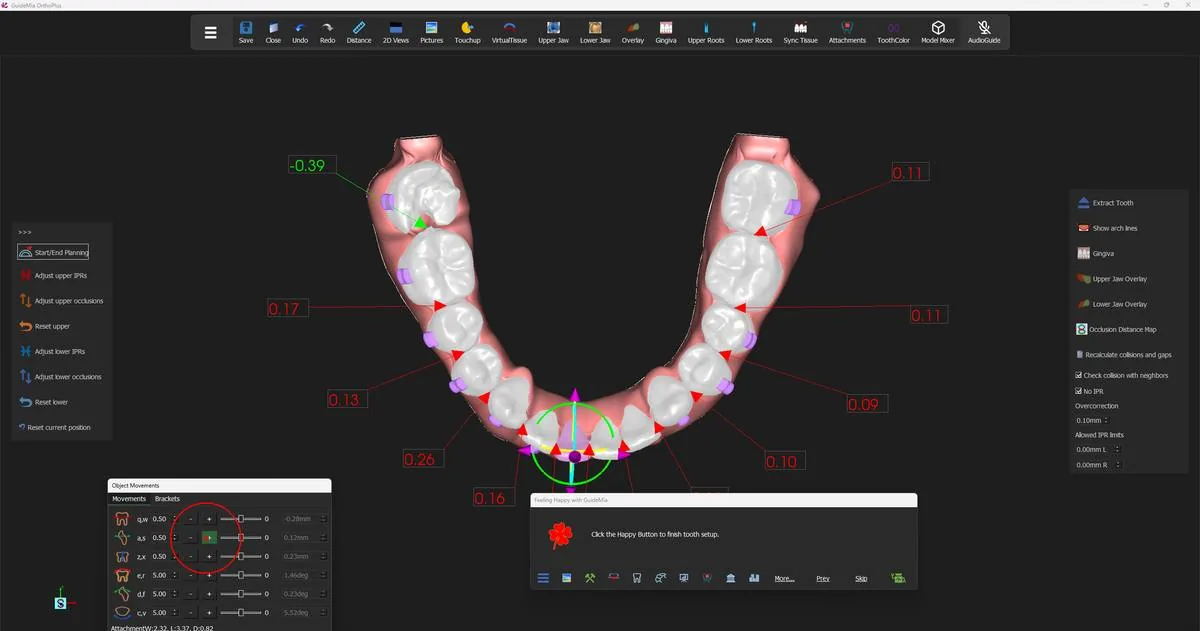 Moving a lower incisor by hand, with the interproximal collision and gap values live along the arch.
Seeing the setup properly
Manual setup rewards looking from more angles than you think you need. The view buttons on the toolbar give you "Front view", "Left view", "Right view", "Top view" and "Bottom view" as single clicks, plus a "Front view" variant described as "Front side view for the assembly window. Upper jaw only." — the upper arch alone, from the front, which is how you check anterior alignment without the lower teeth in the way.
There is also a "Resize Window" button:
"This button will maximize the current image window or restore the regular layout."
Two 3D windows side by side is the right layout for most of the work; one window filling the screen is the right layout for judging the anteriors.
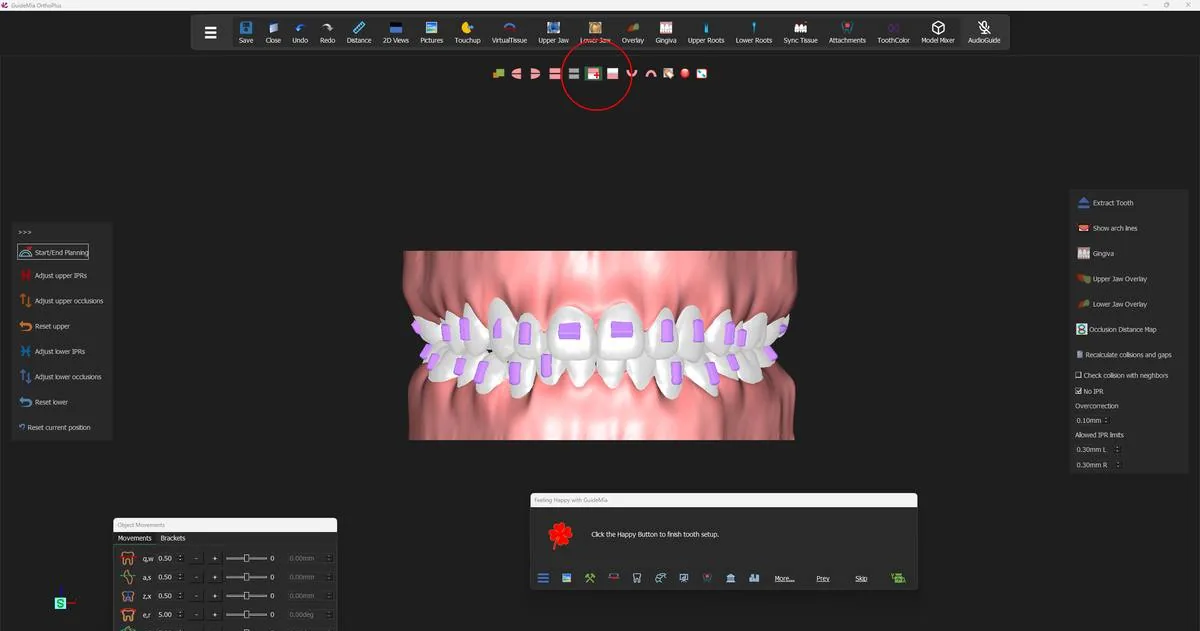 The upper and lower anteriors from the front, mid-setup.
What IPR is for here
Interproximal reduction is how you create the space the arch does not have. GuideMia treats it as a planning quantity: you say how much you will allow, per tooth and per side, and it plans inside that.
The default is none. "No IPR" ships ticked. Until you clear it or set allowed limits, GuideMia will solve crowding by moving teeth along the arch and nothing else. That is a deliberate default and it is the right one — IPR is irreversible on a real patient, and software should not spend it on your behalf.
Three controls set the budget:
- "No IPR" — the master switch. Tooltip: "Allow/disallow IPR".
- "Allowed IPR limits" — two fields, suffixed "mm L" and "mm R", for the left and right side of the currently selected tooth. This is where you say this tooth may give up 0.3 mm mesially and nothing distally. (Both fields' tooltips read "left side"; the second one is the right side despite what it says.)
- "Manual IPR Adjustment" — two read-only figures with the same "mm L" and "mm R" suffixes, reporting the current collision or IPR value on each side of the tooth. These are the numbers you are managing.
"Update teeth according to IPRs" applies the allowed limits to the teeth directly, if you would rather set the numbers and have the software honour them than move teeth and see what the numbers become.
There is a ceiling above all of this. The movement profile — reached from "Settings" on the panel, or Tools > Settings — carries a total IPR limit that ships at 0.50 mm with a minimum of 0.05 mm, and cannot be set above 2.00 mm. If a case will not resolve inside the IPR you are offering it, that form is where the answer lives, and raising it is a clinical decision, not a software one.
"Overcorrection" sits beside these and does something different: "Maximum allowed translation of the tooth center." It is a per-tooth allowance, not an IPR control, and it is easy to change by accident when you meant to change the IPR limit below it.
Letting GuideMia settle the arch
When the manual moves are made, hand the contacts back to the software. "Adjust lower IPRs" and "Adjust upper IPRs" each do the whole jaw, and their description is the most useful paragraph on the page:
"This function will move teeth along the arch curve from or toward the middle incisors so as to remove collisions. If the allowed IPRs are set, this function will honor the allowed values. If the option to Check collusion with neighbors is turned on, the image window will instantly show the current collisions or gaps. Some times this may need to be done multiple tmes to completely remove collisions between adjacent teeth. It is recommended to always use this function to finalize manual adjustment unless certain IPRs are desired and have been planned." [sic — "collusion", "tmes"]
Four things in that paragraph are worth pulling out.
It moves teeth along the arch, from or toward the midline. It does not grind crowns. It redistributes space by sliding teeth, and only spends IPR where you have said it may.
It honours your allowed values. Set the limits first, then run it. Run it first and it solves the arch with whatever budget is currently set — which, on a fresh case, is none.
It usually needs more than one pass. Removing a collision at one contact shifts the tooth that was causing it, which can open or close the contact on its other side. The demo runs the lower jaw twice.
It is the recommended way to finish manual work. Unless you have planned specific IPR values and want them exactly, end every round of hand-adjustment by running it.
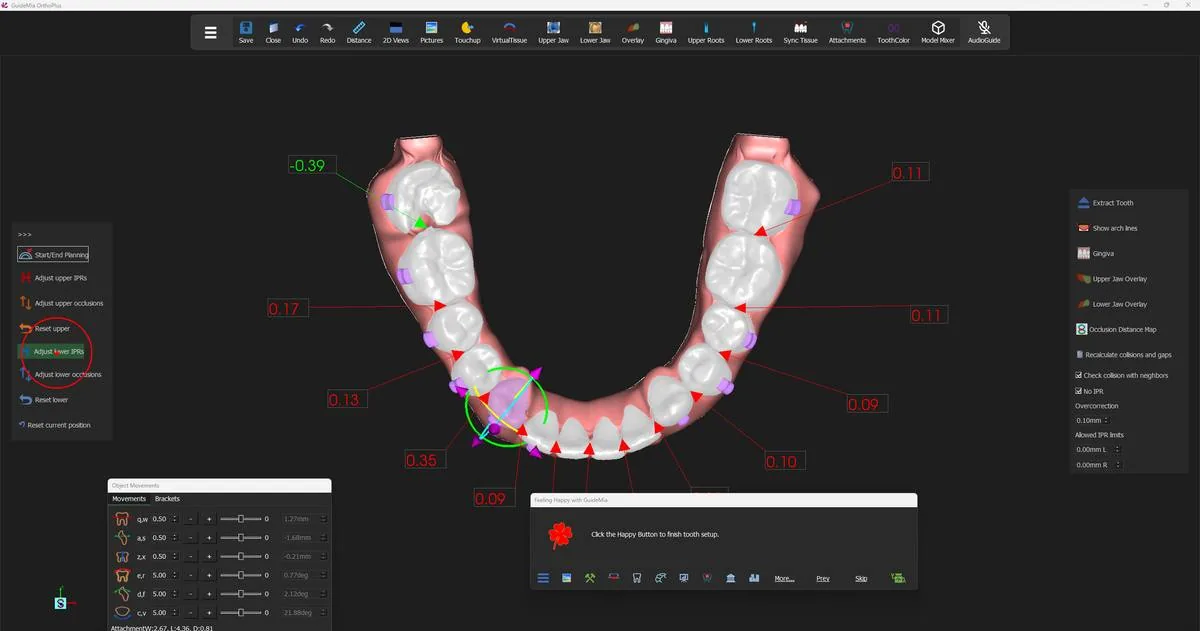 The lower arch after the first IPR pass: remaining collisions in red, a gap in green at the left molar.
Run it, then read the arch. The figures that come back tell you what to do next: values in the low hundredths are contacts you can leave; a stubborn larger value at one contact is a tooth that needs moving by hand or an IPR allowance it has not been given.
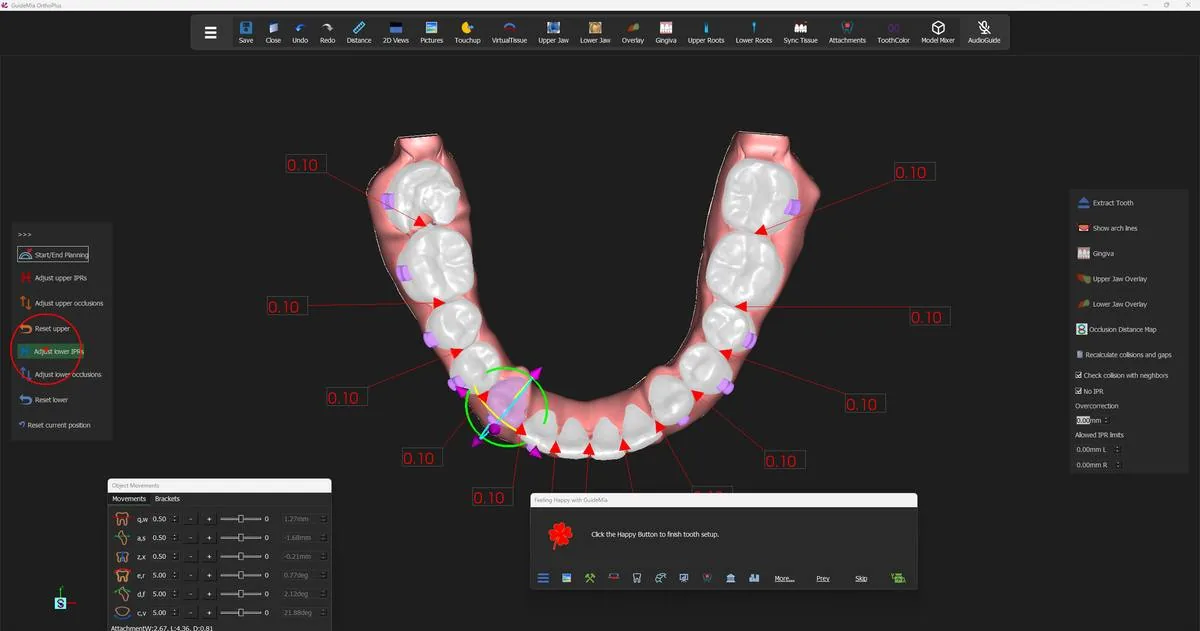 The same arch after re-running the IPR adjustment.
Then do the upper jaw the same way. The two arches are adjusted independently — each has its own button, its own linked mode and its own reset.
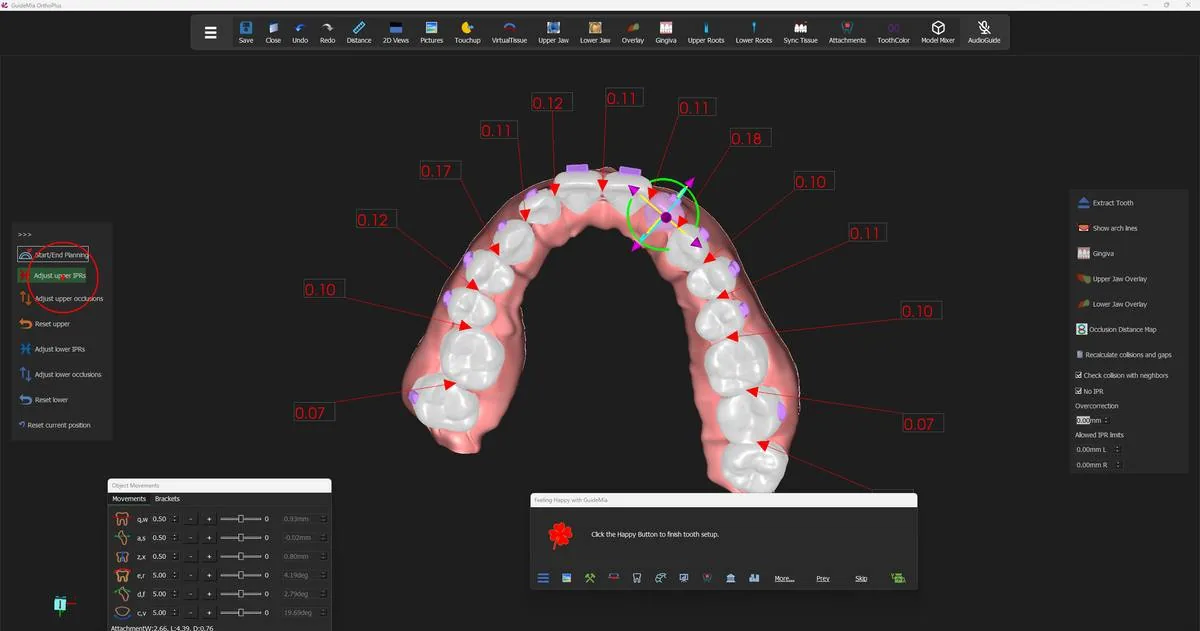 The upper arch after its own IPR pass.
Backing out
Three resets, at three scales, all on the panel:
- "Reset current position" — the tooth you have selected, back to where the automatic alignment put it.
- "Reset upper" / "Reset lower" — every tooth in that jaw.
They reset positions, not the plan parameters. If a jaw has gone somewhere you do not like, resetting it and starting the manual pass again is cheap.
Knowing when to stop
There is no completion signal on this page — the Happy Button will let you leave whenever you press it. The judgement is yours, and it comes down to three questions.
Are the contacts clean? Every interproximal figure at or near zero, with no collision you have not deliberately accepted, and no gap you did not intend to leave.
Is every movement one you would actually ask for? Look at the numbers in the Object Movements dock, tooth by tooth, not just at the shape of the arch. A tooth that reads 12 degrees of torque has a plan behind it whether you meant it or not.
Does the IPR add up to something you will do? The allowances you set here become instructions on the treatment report. Total them mentally per contact and per arch, and be sure it is reduction you would perform.
When those three read right, press the Happy Button — it offers "Click the Happy Button to finish tooth setup." — and the case moves on to staging.
Where you are now
Every tooth has a final position you chose rather than inherited, the contacts between them are settled, and the interproximal reduction the plan depends on is written down against the teeth that will receive it. What does not exist yet is any notion of when — no steps, no order, no aligners. Step 9 turns the distance between where each tooth is and where you have put it into a numbered sequence.
The "Planning Final Positions" section of the workflow panel, and the right-hand tool strip beside it:
| Control | What it does |
|---|---|
| "Start/End Planning" | Enters and leaves manual tooth setup |
| "Plan movements from step" | Keeps existing steps up to a given step; replans only after it |
| "Upper Linked Mode" / "Lower Linked Mode" | Neighbouring teeth follow the moved tooth by a reducing amount |
| "Adjust upper IPRs" / "Adjust lower IPRs" | Slides teeth along the arch to remove collisions, inside the allowed IPR |
| "Adjust upper occlusions" / "Adjust lower occlusions" | Moves that jaw's teeth vertically using the opposing jaw as the reference |
| "Reset upper" / "Reset lower" / "Reset current position" | Undo at jaw and tooth scale |
| "Current Tooth ID" | Which tooth the per-tooth controls apply to |
| "Overcorrection" | Maximum allowed translation of the tooth centre |
| "No IPR" | Master allow/disallow for interproximal reduction; ticked by default |
| "Allowed IPR limits" ("mm L" / "mm R") | The budget for the current tooth, per side |
| "Manual IPR Adjustment" ("mm L" / "mm R") | Read-only: current collision or IPR value per side |
| "Update teeth according to IPRs" | Applies the allowed limits to the teeth |
| "Recalculate collisions and gaps" | Refreshes the interproximal figures |
| "Check collision with neighbors" | The live collision and gap display |
| "Occlusion Distance Map" | The map from step 7, for the current jaw |
| "Extract Tooth" | Marks a tooth for extraction from here |
| "Show arch lines", "Gingiva", "Upper Jaw Overlay", "Lower Jaw Overlay" | Display toggles for judging the setup |
Two tools that the demo does not use but that a harder case will want:
"Crown Morphing" rebuilds a crown that a large movement has made look wrong:
"For some situations, for example, a tooth has a big extrusion, this function will make the crown looks longer. When the tooth has large rotation angle, this function can reduce the soft tissue twist and repair the tooth model when the facial area has missing part."
The placement widget has a square handle for the same problem — fixing soft tissue twist when a tooth's rotation is large.
"All Teeth Fine Adjustment" does a pass over the whole arch:
"Perform fine adjustment for all the teeth. This tool is specifically for the situations that the tooth alignements are not idea but not too bad." [sic]
Read that scope literally. It is for tidying an arrangement that is nearly right, not for rescuing one that is not.