
An arch model is a solid model of one jaw at one step of the plan. The lab prints it, thermoforms a sheet of aligner plastic over it, trims the plastic to the gingival margin and throws the model away. One model per jaw per step, which is why a fifty-step case is a hundred models and why the two decisions in this step — how many steps to build, and what to write on them — matter more than they look.
That second decision is the case tag. Once a hundred near-identical models are out of the printer and on a bench, the only thing distinguishing model 31 from model 32 is the text embossed on it. GuideMia puts the case's name and the aligner number on every model it builds, and it asks you where to put them before it builds anything.
This step covers the thermoforming path — arch models. Step 12 covers the other one, where GuideMia builds the aligner itself.
Opening the full panel
The design sidebar that appeared at the end of the last step carries the controls the Happy Button needs and not many more. Press ">>>" — "Turn on the full workflow panel and access more functions." — and the Workflow dock replaces both floating sidebars, with the Aligner Design page showing its four sections: "Attachments and More", "Aligner or Model Design", "Arch Model Options" and "Aligner Options".
Everything for the rest of this step is on "Aligner or Model Design".
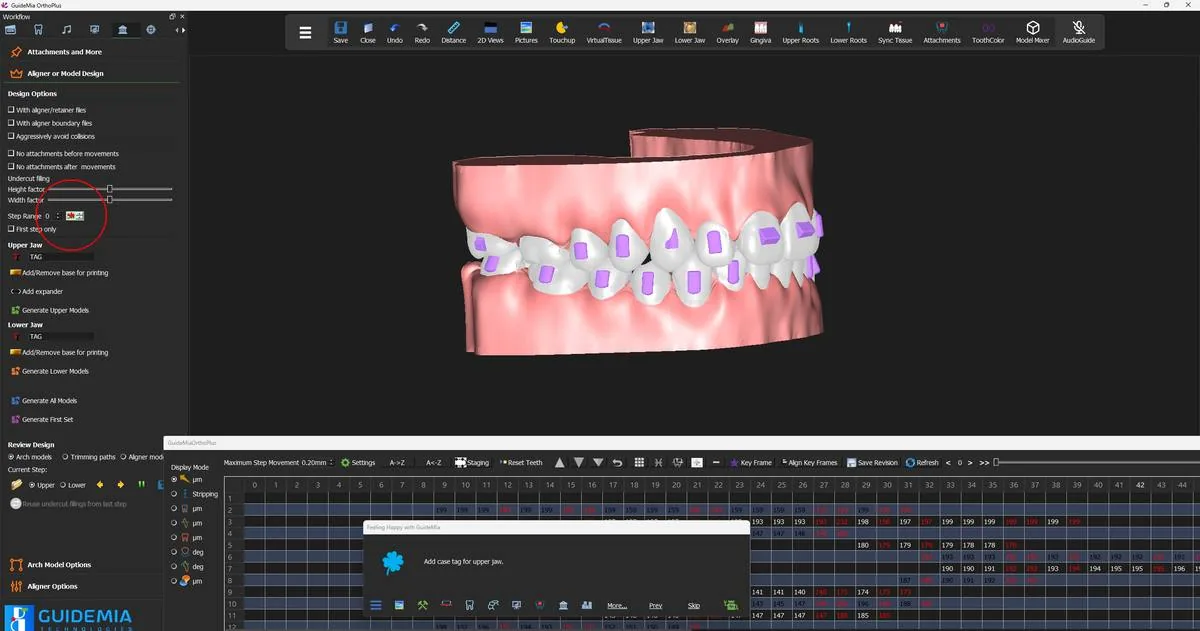 The full workflow panel, with the design options, step range and generate buttons on one page.
Checking the design options
Look at "Design Options" before you look at anything else, because the first checkbox decides what kind of file the generate buttons produce.
"With aligner/retainer files" is clear for an arch-model run. Ticked, it switches GuideMia to building aligners directly, which is step 12. Its own description says so:
"This aligner and retainer option tells the system to create aligner or retainer models for direct printing, instead of arch models for thermoforming."
The generate buttons are the same buttons either way, so this checkbox is worth a deliberate glance every time rather than a habit.
"With aligner boundary files" produces the trimming paths for automatic trimming: "In case you need to generate arch models with jigs for automatic aligner trimming, this option will generate trimming paths files. Each trimming path will include a coordinate file, and an STL file for review purpose." If your lab trims by hand you do not need it; if it trims on a machine you do, and the fixture settings under "Arch Model Options" become relevant.
Three more, all off in the recorded case:
- "Aggressively avoid collisions" re-checks and adjusts for collisions that the staging should already have removed. GuideMia's own view of it: "It will slow down the process though, and normally is not very necessary."
- "No attachments before movements" and "No attachments after movements" [sic — two spaces] leave an attachment off a model where the tooth has not started moving yet, or has already finished. They save model geometry, and both carry the same caution: "any attachment changes like this may lead to additional aligners to be made as attachments template."
- "Undercut filling" has a "Height factor" and a "Width factor" slider governing the material GuideMia adds between the teeth.
Setting the step range
"Step Range" takes a start step and an end step, described as "The start step number to generate aligners or arch models" and "The final step number to generate aligners or arch models". It defaults to the whole plan — the recorded case had 54 steps and the boxes read 0 and 54.
Two reasons to narrow it. The obvious one is a re-run: a case where the first twenty aligners are already with the patient needs models 21 onwards, not 0 onwards. The less obvious one is verification, and it has its own control. "First step only" generates one model and nothing else:
"This option tells the system to only generate the first step. This is typica lly for verification purposes, and will not incur any cost even if you are using the software with a pay-per-lick license." [sic]
Print that one model, thermoform it, and you have proven the whole chain — the plan, the attachments, the fit, your printer, your sheet, your trimmer — before committing the other hundred. On a metered licence it costs nothing to do so.
The operator in the recording narrowed the end step to 5, which is the same idea applied to a demonstration: a short range that exercises every part of the process without waiting for a full arch.
The case tag
The tag is two operations, and the order matters: type the text, then place it.
Type the text first. The tag field starts out reading "TAG". Replace it with the case's identifier, under one restriction:
"Input the case tag here. Only alphabet letters and numbers. Do not include step numbers."
No step numbers, because GuideMia adds them. The recorded case was tagged demo, and the models came out reading DEMO L5 — the tag, the jaw, and the aligner number the model belongs to. That is the point of the field: you name the case once and every one of the hundred models labels itself.
Then place it. "Add/Update Case Tag" puts the text on the model at a default position, inside a bounding frame:
"This function will add the case tag to a default position, then you can manipulate it. The tag is added in different way for arch models or aligner models. The actual texts on the final arch models will have corresponding aligner steps on them. Click this button to finish when the tag placement is done."
Drag it, rotate it and resize it with the frame, then click "Add/Update Case Tag" again to finish. GuideMia's guidance on where to put it, given at this step:
"Generally, the tag should be far from the tooth area for arch models, and next to a molar at the distal side."
Far from the teeth, because the sheet has to draw down cleanly over the arch and a raised tag under the plastic is a defect waiting to happen. Distal to a molar, because that is the part of the model the aligner never covers and the part a technician can still read with the model in one hand.
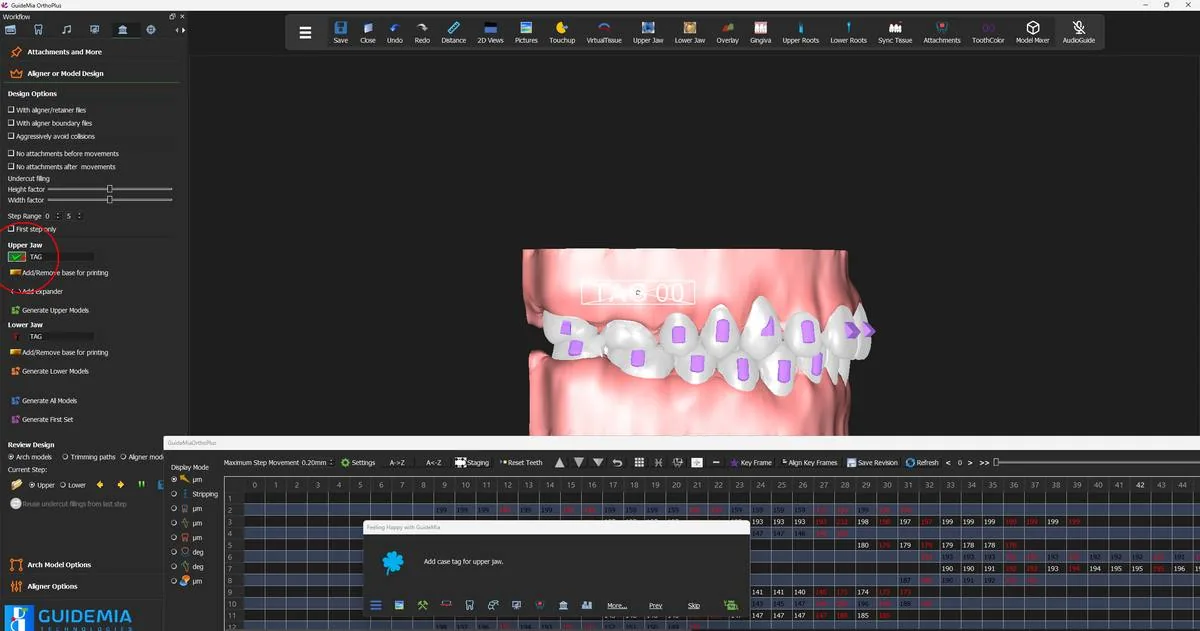 The upper case tag placed on the model, inside its manipulation frame.
Then do the lower jaw. It has its own tag field and its own "Add/Update Case Tag" button, and it is a separate placement — the frame starts at the lower jaw's default position, not where you put the upper one.
Generating
Three buttons produce output, all carrying the same description: "Generate Upper Models", "Generate Lower Models" and "Generate All Models". The demo uses the last of the three.
"Generate the arch models or aligner models. All the models within the given step range will be generated for the upper jaw. The function will ask for a file name. Typically you want to create a new folder to hold the files. When you give the file name, do not use aligner numbers."
Both halves of that instruction earn their place. A new folder, because a full case is hundreds of files and they are much easier to hand to a lab as a directory than to pick out of a downloads folder. No aligner numbers in the name, because GuideMia appends them — files arrive as <name>_Upper_<n>.stl and <name>_Lower_<n>.stl, and a name that already contains a number produces something no-one can sort.
Alongside the models GuideMia writes an XML order file listing every step against its model file and the case serial number, and — on a run with a fixture — the trim-line file for each step. That manifest is what a lab's production system reads, so it belongs in the folder you send.
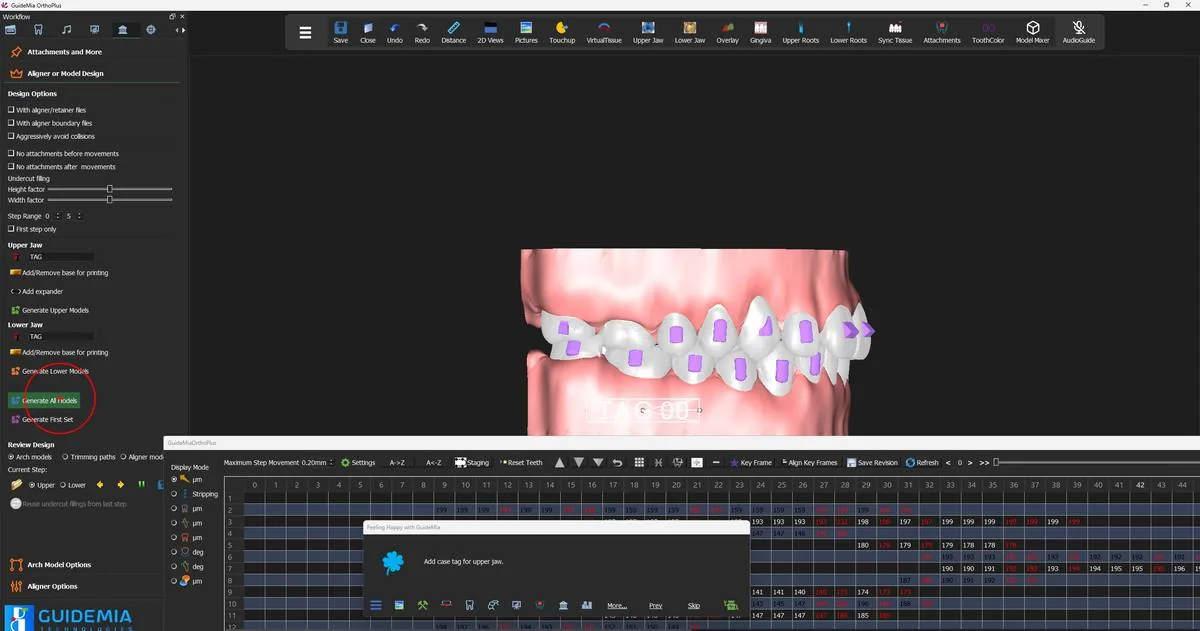 Generating every model in the step range for both jaws.
Plan Validation
Generation does not start immediately. GuideMia runs the plan through its validation criteria first and shows you what it found:
"Your treatment plan does not pass all the validation. The following items with checkmarks need your attention. If you wish to continue, click on the Ok button. Otherwise, cancel the operation. However you must be aware ignoring those criteria can result in invalid plan and unusable surgical guides."
Only the items actually marked apply to your case. On this case one is marked — "There is no CT scan or the CT scans have slice thickness bigger than 0.5mm, which is not recommended." — and it is expected, because this is an optical-scan case with no CBCT and has been since step 1. The other two lines in the list, on bracket interference and on step movements exceeding the defined maximum, are unmarked.
"OK" stays disabled until you tick the acknowledgement:
"I have thoroughly reviewed the input data and treatment plan, and I fully understand the issues and risks afore-mentioned. I'd like to continue."
That is deliberate. Read the marked items, decide whether each one is a known property of the case or a genuine problem, and only then tick and continue. An unmarked list is the software telling you the plan is clean; a marked one is the last chance to go back to the planning page.
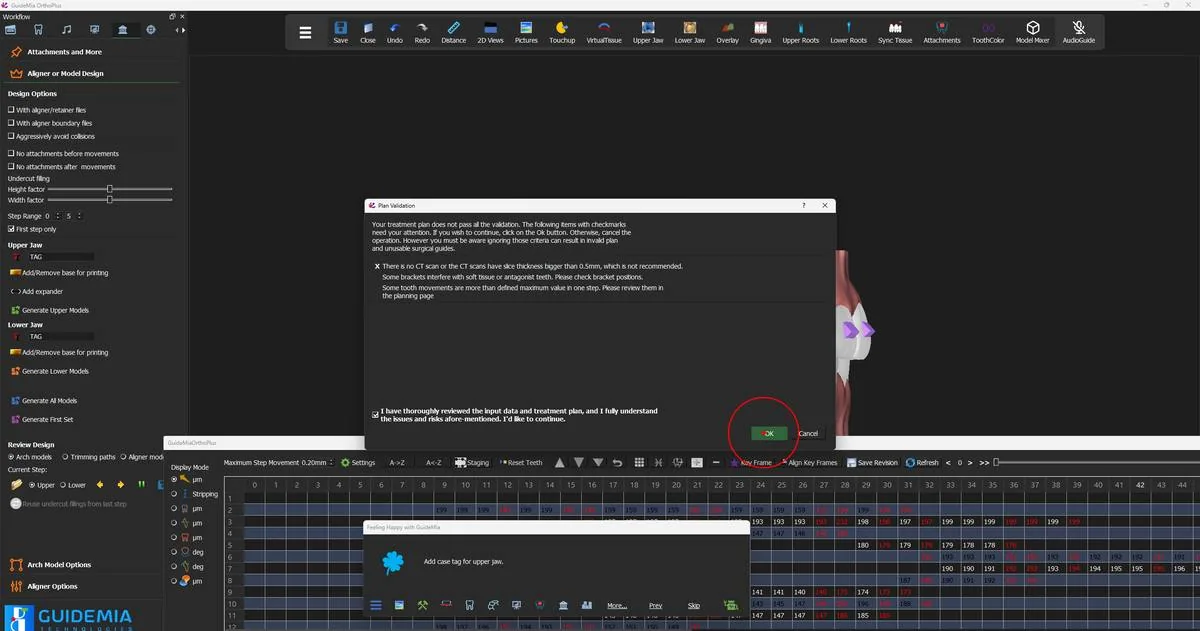 Plan Validation, with the acknowledgement that enables OK.
Once you confirm, GuideMia builds the models. The 3D window shows the work as it goes, jaw by jaw and step by step — a live preview of progress rather than an exact picture of the output files.
If generation completes without producing anything, the licence is the first place to look: output is metered, and an inactive licence or an empty credit balance stops files being written. See the licensing guidance rather than re-running the generation.
Reviewing what came out
"Review Design" at the bottom of the section is where you inspect the files without leaving GuideMia, and it is not merely a viewer.
"Arch models" is selected by default, and "Upper" and "Lower" choose the jaw. The transport beside "Current Step:" walks the set — a previous button ("Go to last model"), a next button ("Go to next model"), a stop button ("Stop the review") and a save button.
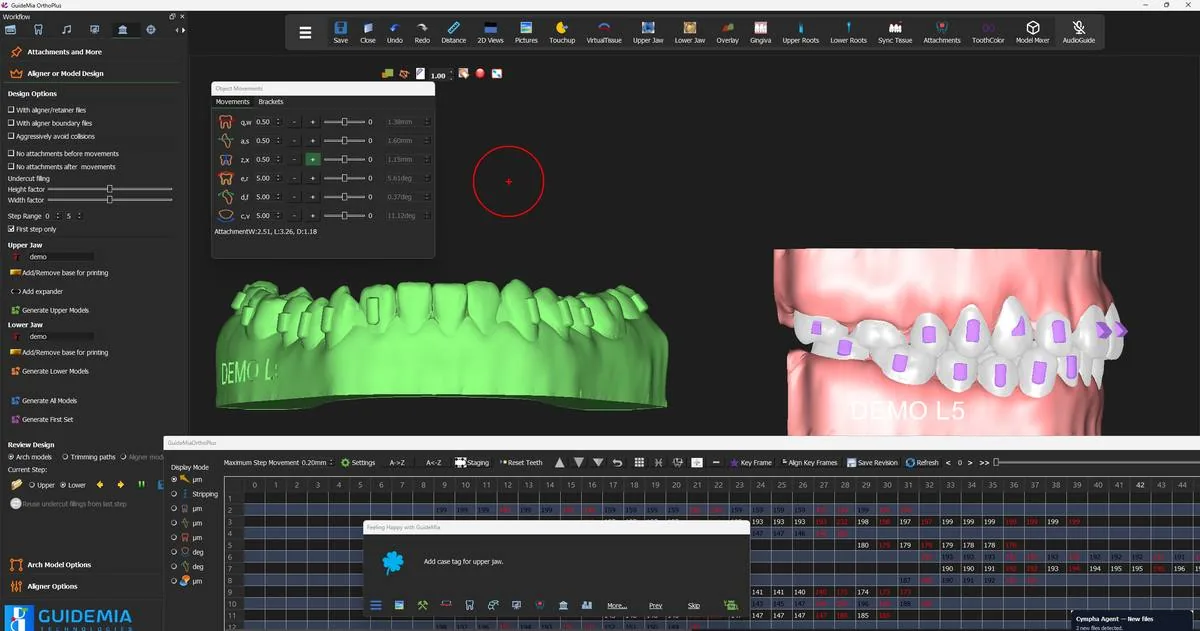 The first generated arch model, tagged and ready to inspect.
Walk the range. What you are looking for is the tag — legible, clear of the tooth area, in the same place on every model — and the interproximal regions, because that is where an arch model differs most from the arch it came from:
"You can edit the arch models in the reviewing process. Each model will come as multiple component: the base model, and the interproximal fillings. You can double click on a filling area, move it and resize it."
Those fillings are deliberate. A thermoformed sheet cannot follow a deep undercut between two crowns and will either tear or lock the aligner on, so GuideMia builds material into the embrasures. Turning the model to an occlusal view is the quickest way to see all of them at once; a filling that has grown too far up the crown is one you can double-click and pull back.
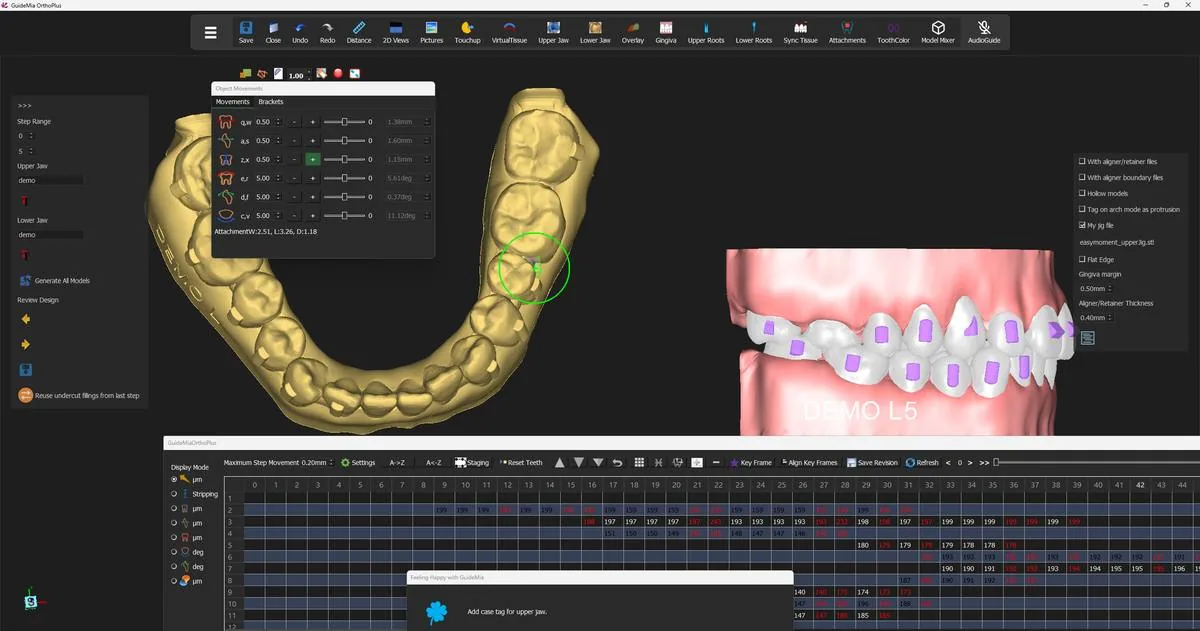 A generated lower arch model from the occlusal, with the interproximal fillings visible between the crowns.
If you change a model, use the save button — "Save the current model or path file. If it has been changed, the system will save it in a different time." [sic] — before moving on, because the transport does not save for you.
If you are reviewing files from an earlier session rather than the ones you have just made, the file-selection button beside the review options points the transport at them:
"By default the system will automatically pick up the newly generated files. This file selection will let you pick files in different session. It does not prevent you from selecting files from other cases, but that does not make much sense, so be sure only select files for this case."
Where you are now
A folder holds an arch model for every step in the range, for both jaws, each one carrying the case tag and its own aligner number, each one with its interproximal fillings reviewed. That folder is what a thermoforming lab needs and nothing else in the project has to travel with it.
Two steps remain. Step 12 takes the same plan down the other path and generates the aligners themselves. Step 13 shares the case for review and saves the work.
"Aligner or Model Design" and "Arch Model Options", beyond what the demo used:
| Control | What it is for |
|---|---|
| "With aligner/retainer files" | Switches the output from arch models to aligners — step 12 |
| "With aligner boundary files" | Also writes trimming paths, for automatic trimming |
| "Aggressively avoid collisions" | Extra collision checking during generation; slower |
| "No attachments before movements" | Omits an attachment until its tooth starts moving |
| "No attachments after movements" [sic] | Omits an attachment once its tooth has arrived |
| "Undercut filling" — "Height factor", "Width factor" | Governs the interproximal fillings |
| "First step only" | One model, for verification; free on a metered licence |
| "Add/Remove base for printing" | Adds a bar joining the molar regions, for printing models vertically |
| "Add expander" (upper only) | Connects the middle of the upper arch, for expansion cases |
| "Generate First Set" | Generates the first set rather than the whole range |
| "Reuse undercut fillings from last step" | Carries the previous step's fillings forward |
| "GuideMia fixture" | The default trimming fixture; selected unless you change it |
| "Ortho-automation fixture" | A worked example of a customised jig |
| "My jig file" / "EasyMoment jig file" | Your own jig STL, which must be in the right coordinate system |
| "Gingiva margin" (mm) | Margin from trimming path to aligner boundary — "You should contact your supplier for this value." |
| "Posterior edge clearance" (mm) | Lifts the trim at the back of the arch so aligners seat and release more easily |
| "Fill in undercuts and gaps" | On by default; not recommended to turn off |
| "Hollow models" + thickness (mm) | Hollows the model to save resin |
| "Tag on arch mode as protrusion" [sic] | Tag raised when on, cut in as slots when off |
| "Tag on crown too" | Adds a small aligner number to the first posterior tooth without an attachment |
The fixture group is only meaningful when "With aligner boundary files" is on: the trimming paths are generated against the fixture file and the arch models are built with the fixture part attached, so choosing a jig you do not own produces models a trimmer cannot hold.