
An aligner is a shell that grips the crowns. On its own a shell can tip a tooth and it can push it along the arch, but there are movements it cannot deliver because there is nothing on the smooth surface of the crown for it to hold. An attachment is the answer: a small piece of geometry bonded to the tooth, and a matching socket in every aligner that covers it, so the plastic has a purchase point and can apply the force in the direction the plan asked for.
That makes this the first stage of the guide where the work is about the appliance rather than the plan. Nothing you do here changes where a tooth ends up; the target positions and the staging are settled. What changes is whether the aligners you are about to generate can actually deliver them.
Attachments are also the last thing that can move before the models are built. Everything from here on — case tags, arch models, aligners — is generation, and generation reads the attachment set as it finds it. This is the page to be thorough on.
Getting to the page
The Happy Button reads "Click the Happy Button to enter aligner or bracket bonding guide design." Press it. Because there are no brackets on these teeth, GuideMia takes the aligner branch: the Aligner Design page opens and the button moves to the "Attachments" step, re-wording itself to "Automatically add attachments or force ridges."
You may find attachments already on the crowns when you arrive, as in the recorded case — GuideMia runs the automatic attachment tool as it leaves movement planning, so the first thing you see is a proposal rather than a bare arch. Pressing the Happy Button at this step runs that same tool again.
This case is run fully automatically: GuideMia decides the type, the shape and the size of every attachment, and the demo accepts what it proposes. That is one way to work and not the only one. You have full control over all three — every attachment on the arch can be changed to a different type, reshaped, resized, repositioned or removed, and you can place your own where the automatic pass put none. The rest of this step is that control: the automatic result first, then each of the tools that overrides it.
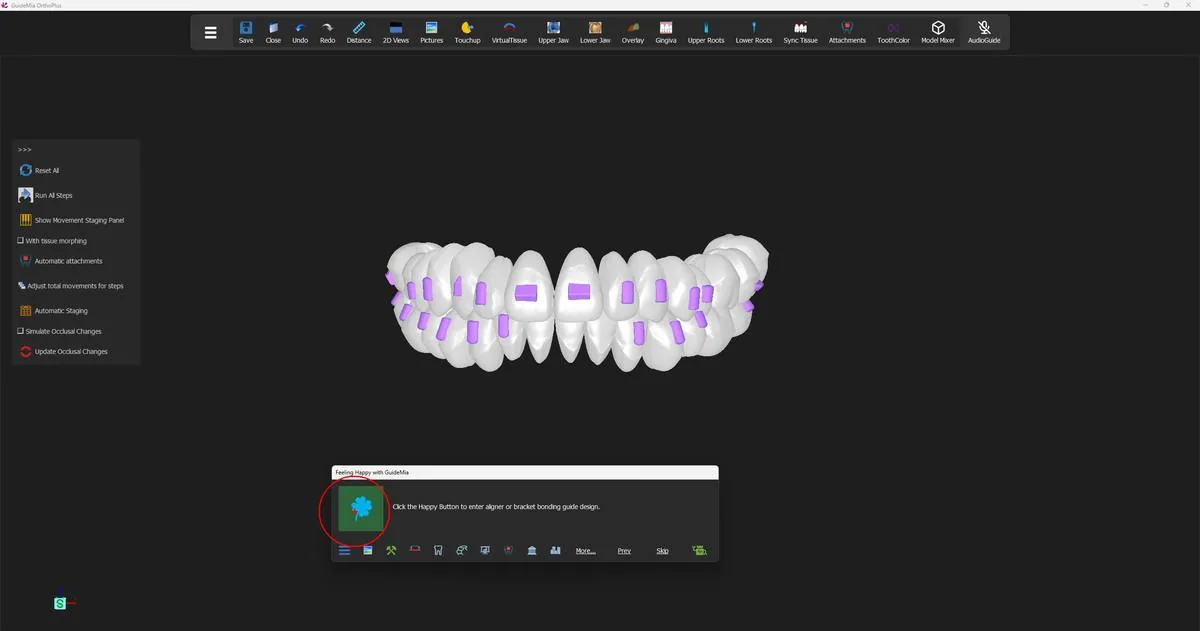 The teeth carrying their first set of attachments, with the Happy Button about to open aligner design.
The workflow panel is hidden at this point in the demo, and this one step behaves differently from every other because of it: instead of building a sidebar, GuideMia floats the whole "Attachments and More" section as its own window, headed "Attachments for aligners". Every attachment tool in the product is on it.
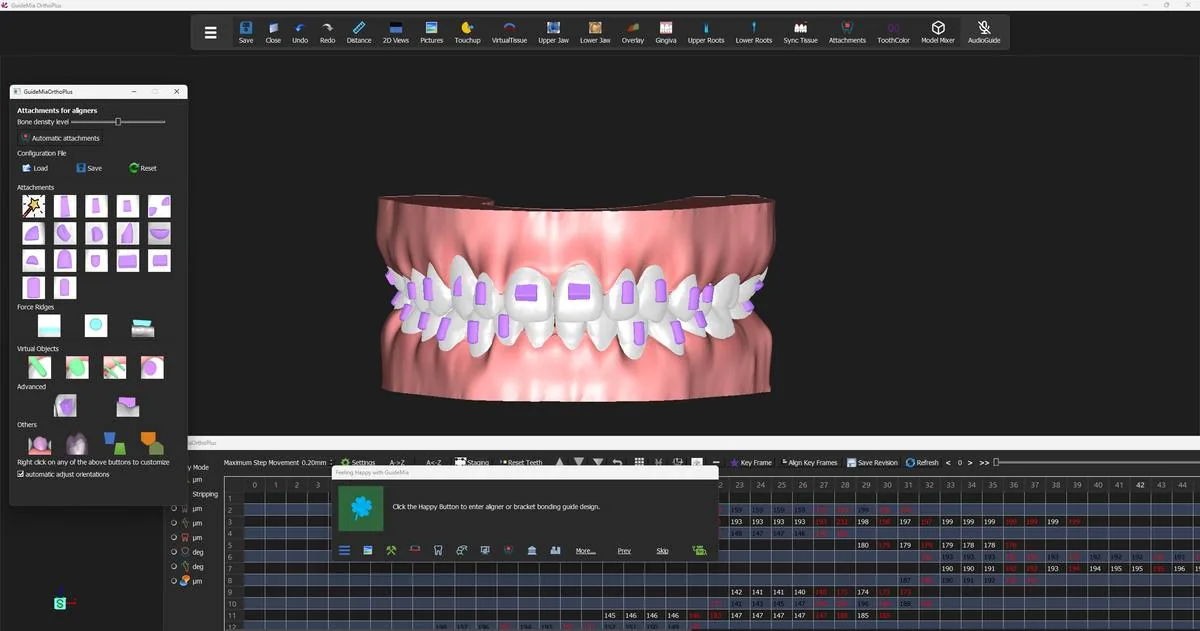 The attachment tools floated as their own window beside the model.
Clearing the view first
You have been looking at coloured analysis overlays for two steps — the buccal-lingual movement map, the bone density map on the roots, the occlusal distance map on the crowns. They are useful for judging a plan and they are in the way for judging geometry, because an attachment reads as a shape and a shape is hard to see through a colour scale.
Turn them off from the right-click menu in the 3D windows: "Turn off buccal-libgual movement map" [sic], "Turn off bone density map" and "Turn off Occlusal Distance Map". What is left is the crown surface and the attachments standing off it, which is what you are here to look at.
The automatic pass, and the one setting that steers it
"Automatic attachments" is the tool the Happy Button presses. GuideMia's own description of it:
"This is the automatic attachment tool. The system will automatically determine which teeth need attachments or force ridges, also known as power ridges, and what kind of attachments are needed, as well as how big they should be. The system has a full set of criterial to make the initial decisions, but you can always add, delete or modify the attachments or force ridges. ." [sic]
The last sentence is the working instruction for this whole step. The automatic pass is a starting point that is right most of the time, not a result to be accepted unread.
One control biases it, and it is worth setting before you press rather than after. "Bone density level" is a slider:
"This slider sets a rough bone density level. When the value is higher, the system tends to add more attachments or bigger ones when the automatic tool is used."
It is a judgement about the patient rather than about the software, and the setting is yours to make against your own protocol. Move the slider, then run "Automatic attachments" again to see what it changed.
"automatic adjust orientations" sits at the bottom of the window and is ticked by default. Leave it ticked unless you have a reason not to.
If your practice has settled on a house standard, the "Configuration File" buttons — "Load", "Save" and "Reset" — carry the attachment configuration between cases, so the automatic pass starts from your preferences rather than the factory ones.
Reviewing what it proposed
Rotate the arch and look at every attachment, from the buccal and from the lingual. Double-click one and GuideMia puts a bounding box and a manipulator around it; drag to move it, use the box handles to resize, and press Escape to finish the adjustment. The pop-up menu in the image windows deletes one you do not want.
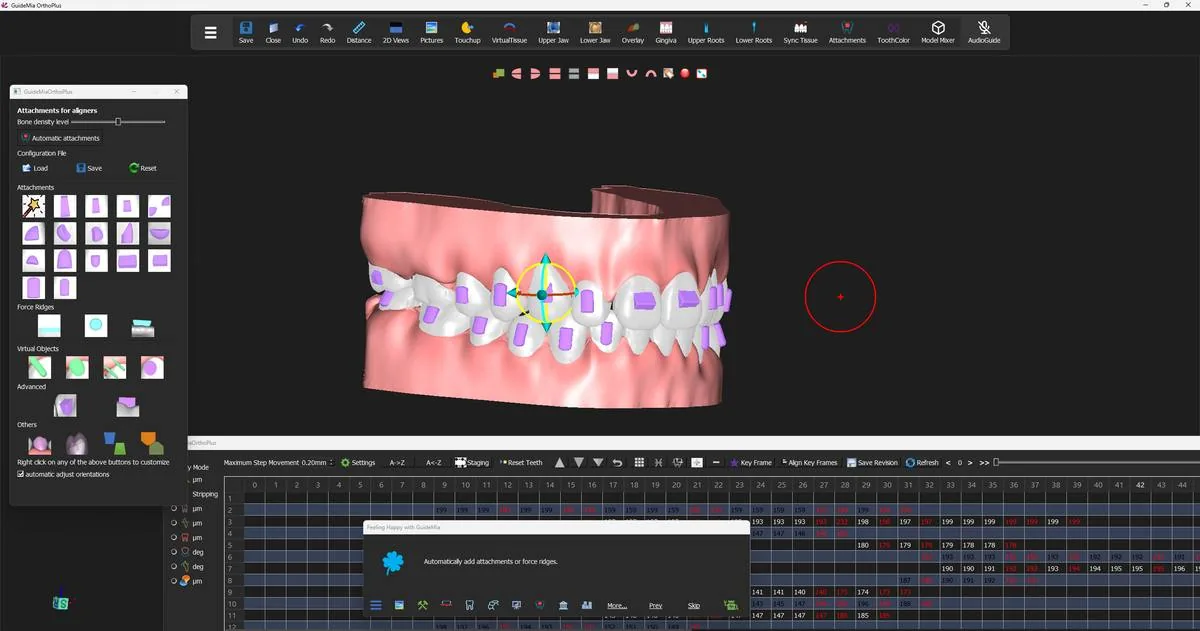 An attachment selected for adjustment, with its manipulator on the crown.
Turn the model right over and check the same attachments from below and behind. An attachment that looks well placed from the front is often the one sitting too close to the gingival margin, or running off the mesial edge of a crown that is still rotated at this step of the plan.
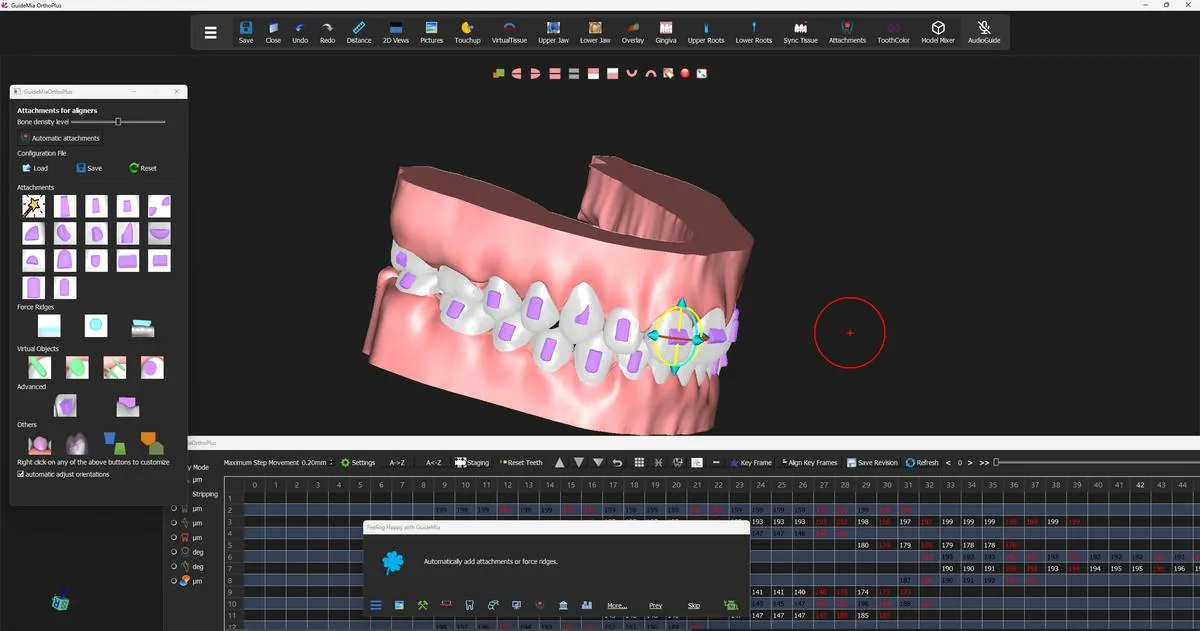 The same set checked from the side, with the model turned to bring the posterior teeth into view.
Two hard limits govern what you can do:
- GuideMia allows one or two attachments per tooth. Not three.
- With the type set to "Automatic", the system may decide no attachment is needed and add nothing. If you want an attachment on a particular tooth regardless, choose its type first and then place it.
Adding one by hand
The order matters. Set the Attachment type dropdown first, then switch on "Add Attachment", then click the tooth. An attachment of the chosen type appears with a bounding box; move and resize it, and click "Add Attachment" again to finalise. Double-clicking a finished attachment reopens it for relocation or resizing at any time.
"Smooth" exists for one reason, in the product's words: "Certain attachment models have sharp corners. This will fix it." Run it on any attachment whose edges look as though they would be uncomfortable against the mucosa or hard to release from the shell.
The shapes GuideMia offers
The attachment-type dropdown, in order:
Automatic|Regular Large|Regular Medium|Regular Small|Root Control Pair|Root Control Single|Rotation 1|Rotation 2|Rotation Single|Anchorage L|Anchorage S|Intrusion Torque L|Intrusion Torque S|Extrusion Anterior L|Extrusion Anterior S|Extrusion/Intrusion L|Extrusion/Intrusion S|Rectangular|Cylindrical|Triangle|Half cylinder|S Shape|Rounded Rectangle|Wedge|Dual bar|User defined
They fall into two families. The first group is named for the job — root control, rotation, anchorage, intrusion torque, extrusion — and is what you reach for when you know which movement on the staging table is the one you are worried about. The second group is named for the shape — rectangular, cylindrical, triangle, wedge, S shape, dual bar — and is what you reach for when you have a preference of your own and want to place it directly. Which shape suits which movement is a clinical decision and belongs with your protocol, not with this guide.
"User defined" takes an STL file of your own:
"When you select the user-defined, you can choose an STL file from your system and add it as attachment. If you use user-define, it is recommended to place the origin at about one third of the thickness from the bottom of the attachment file." [sic]
The buttons on the floating window are grouped under the labels "Attachments", "Force Ridges", "Virtual Objects", "Advanced" and "Others", and the window carries one line of instruction that is easy to miss and worth acting on: "Right click on any of the above buttons to customize".
Force ridges, and why they are not attachments
A force ridge — a power ridge — sits under its own label with a shape dropdown offering "Rectangular", "Spherical" and "Half cylinder", and "Add ForceRidge" placed exactly the way an attachment is placed. The difference is in what generation does with it:
"A force ridge is not added to the final arch models, instead it is subtracted from the arch models. Therefore what matters is the shape inside the tooth area, not the outside part."
Read that once more before you place one. Sizing a force ridge by how it looks standing proud of the crown is sizing the wrong half of it. The part that does the work is the part buried in the tooth, because that is the volume that will be cut away, leaving a bump on the inside of the aligner that presses on the crown. A "Smooth" button for force ridges sits beside the add button.
Cutouts and button platforms
Two more things get placed here, and neither of them changes the tooth.
Cutouts — "For a hook", "for a button", "For a tab" and "User Defined" — are placed with "Add Cutout", and GuideMia is explicit about their scope: "The cutouts will not impact the arch models. Instead, they will participate the generation of aligner trimming paths." They are windows in the finished aligner, not features of the model.
"Add Button Platform" is the other half of the same story:
"In case the clinicians want to use rubber bands to pull the teeth in the treatment, they may need to bond a button to the tooth. This function will create a cylindrical area so that the aligners can later on be made with this area available to bond th button." [sic]
If elastics are in the treatment plan, the platform and the cutout are placed together — one to give the button somewhere flat to sit, one to let the aligner clear it.
Where staging comes back in
Three things tie this page back to the movement plan you have just finished.
The automatic tool reads the plan. It decides which teeth need help and how much from the movements that are on the staging table, so an attachment set generated before you were happy with the staging is not the set you want; if you went back and re-staged, run "Automatic attachments" again and re-inspect.
Attachments ride the tooth. Whatever an attachment is bonded to takes it along through every step, so an attachment placed on a tooth that rotates heavily later in the plan will present a different face to the aligner at step 30 than it does at step 1. The steps in between are where to check that.
And changing an attachment has a cost in aligners. GuideMia warns about this on the design options you will meet in the next step, and the warning applies to any change made here: "any attachment changes like this may lead to additional aligners to be made as attachments template." An attachment that appears mid-course needs an aligner to bond it through.
Moving on
When the set is right, press the Happy Button. GuideMia moves to "Case Tag", the message becomes "Add case tag for upper jaw.", and the design sidebar appears in place of the attachment tools — step range, the two jaw tag fields, the generate buttons and the review transport.
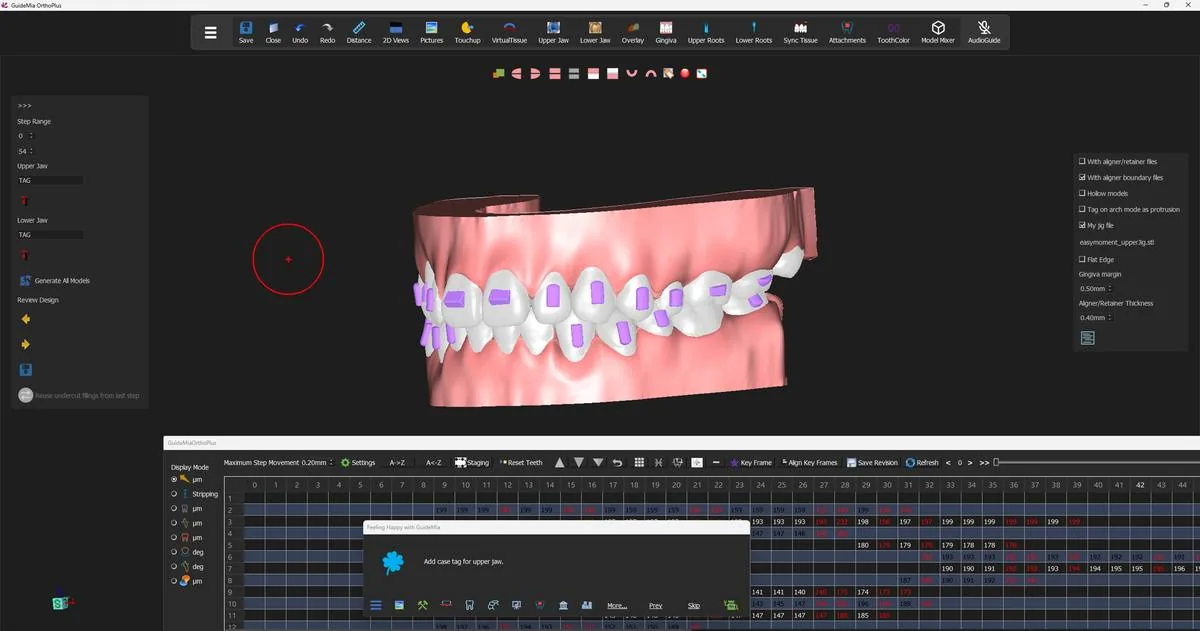 The Attachments step finished; the design sidebar and the option strip appear, ready for the case tag.
Where you are now
Every tooth that needs one carries an attachment, force ridges are placed and sized from the inside, and any cutouts and button platforms the treatment calls for are in position. The case is now fully specified: positions, staging and appliance features. The next two steps turn that specification into files.
The demo runs the automatic tool and adjusts by hand. "Attachments and More" carries a good deal more:
| Control | What it is for |
|---|---|
| "Bone density level" | Biases the automatic tool towards more and larger attachments |
| "Automatic attachments" | Places the whole set from the treatment plan |
| "Configuration File" — "Load", "Save", "Reset" | Carries your attachment configuration between cases |
| Attachment type | The type placed by the next manual add; set it before you click |
| "Add Attachment" | Place one by hand; click again to finalise |
| "Smooth" | Rounds off an attachment with sharp corners |
| "Add Button Platform" | A flat cylindrical area for bonding an elastic button |
| Force-ridge shape | "Rectangular", "Spherical", "Half cylinder" |
| "Add ForceRidge" | Place a force ridge; it is subtracted from the model, not added |
| Cutout type | "For a hook", "for a button", "For a tab", "User Defined" |
| "Add Cutout" | A window in the aligner; the arch model is unaffected |
| "Anterior Bite Ramp" | A ramp on an anterior tooth to open the bite so lower attachments clear |
| "Posterior Bite Ramp" | The same idea on a molar occlusal surface |
| "Spacers (Virtual Teeth)" | A virtual tooth placed between two teeth as an attachment |
| "Emerging cap/Replacing Tooth" | A virtual tooth that occupies and inherits the movement of a real one |
| "Veneer" | Adds veneers to teeth |
| "Twin blocks" | "This is an experimental function in this release." |
| "GuideMia wings for mandibular advancement" | "This is an experimental function in this release." |
| "automatic adjust orientations" | Lets the automatic pass set attachment orientation; ticked by default |
| "Generate combined model for review" | One PLY of crowns, attachments and soft tissue, for a quick third-party look |
Two of these have a prerequisite that reaches back to step 4. A spacer is attached to a tooth and rotates with it, so "if a tooth rotates too much it is not recommended to attach the virtual tooth to it" — and GuideMia adds that this "needs to be take into account before the tooth segment" [sic]. If a case is going to need a virtual tooth in a heavily rotated site, the place to create it is the first page of the workflow, when the scans have only just been loaded.