
Up to now the case has had two states: where the teeth are, and where you have decided they should end up. An aligner case cannot be made from two states. It has to be a sequence — a numbered series of positions, each close enough to the last that a tray can move a tooth from one to the next.
Staging is where that sequence is created, and simulation is how you check it. Together they answer the question the whole plan has been deferring: how many aligners, and does anything crash into anything else on the way?
The Happy Button reaches this stage with the message "Click the Happy Button to enter bracket design or movement planning." and its icon turns blue. That colour change is the visual marker that the case has crossed from planning into design.
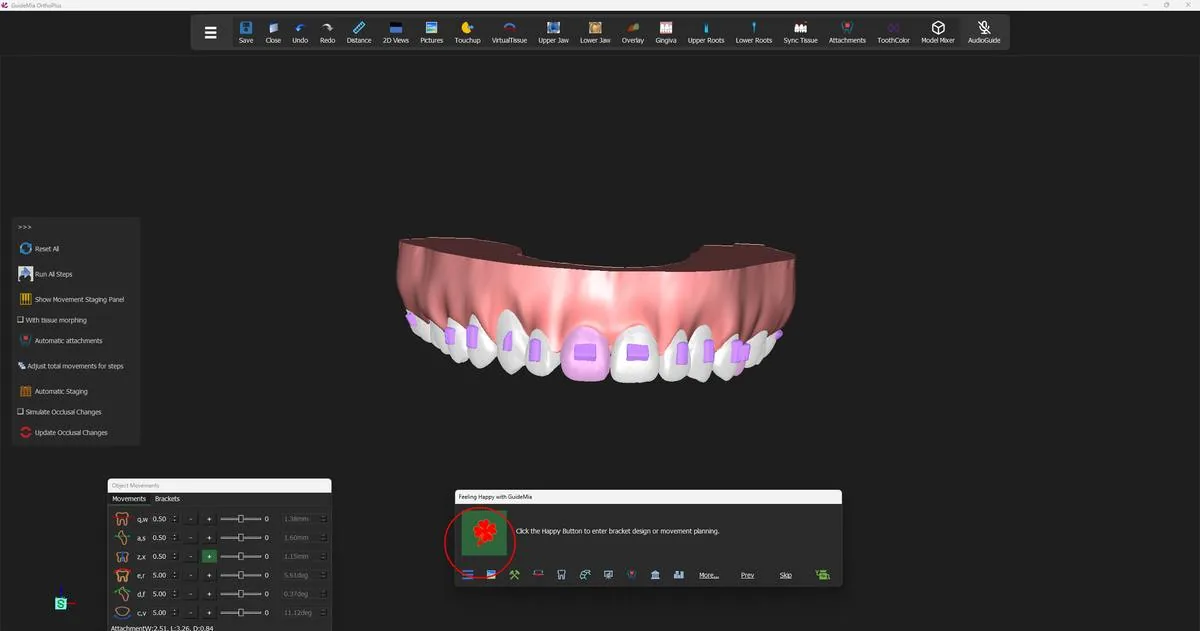 The Movement Planning page, with the staging and simulation tools on the panel.
Planning the steps
"Reset All" is how the sequence is built or rebuilt:
"Reset the movement plans for all the teeth. This is to reset the steps but not change the final tooth positions. This function is not reversible. If you are working on a case that has gone through a part of the actual treatment, this can lead to wrong movement data for the current step."
Read both halves. It does not touch your final positions — everything from step 8 survives it. It does throw away every step that exists, and it cannot be undone. On a fresh plan that is exactly what you want. On a case where part of the treatment has already been delivered, it is the one button on this page to leave alone; the "Plan from step" control exists for that situation instead, and replans only the steps after a point you nominate.
GuideMia asks before it proceeds:
"A revision file has been saved. Do you want GuideMia to plan movement orders?"
Answer Yes and it distributes each tooth's total movement across steps. When it resets a tooth's plan it "simply regenerates equally distributed movements" — an even ramp from start to finish, which is the sensible default and not yet a considered order of operations.
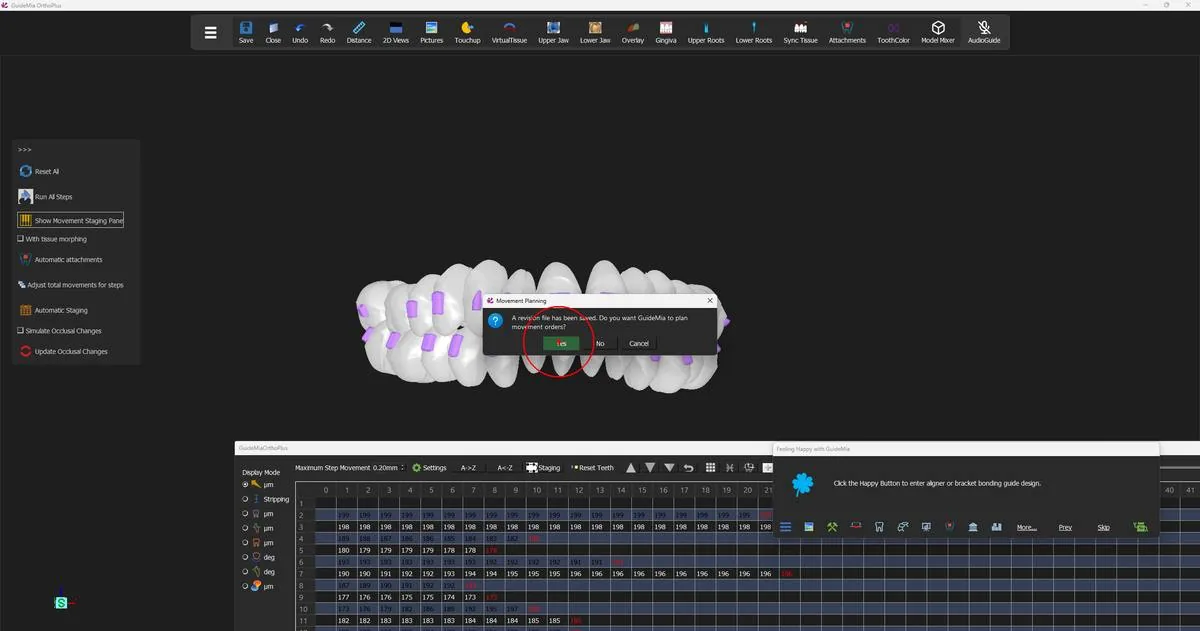 GuideMia confirming before it plans the movement orders.
What decides the number of steps
Nothing on this page sets the step count directly. It falls out of arithmetic: the largest movement any tooth has to make, divided by the most that tooth is allowed to move in one step.
Those per-step maxima live in the movement profile, reached from "Settings", and you can change them. The one that usually governs is crown-centre translation, which ships at 0.20 mm per step — and that figure is shown on the staging toolbar as "Maximum Step Movement", so you can see the constraint while you read the table it produced. Per-step rotation, torque and inclination start at 2 degrees each; extrusion and intrusion at 0.10 mm.
Those are starting values, not fixed limits. Raising a maximum shortens the case and lowering it lengthens the case, and which figures are right is a clinical decision that belongs with your own protocol rather than with this guide.
So a tooth with 4 mm of translation to deliver needs at least twenty steps, and no amount of staging cleverness will make it fewer. If a case comes out longer than you expected, that form is the answer. "Upper Steps" and "Lower Steps" on the panel show the current maximum per jaw and can be edited, which asks GuideMia to plan within a limit you set rather than the one it derived.
Running the simulation
"Run All Steps" plays the plan:
"Simulate the movements of all the teeth and all steps. You can always rotate and zoom the 3D image windows while the simulation is running. You can also perform some other operations, such as turn on and off root display, but you should not expect to change workflow pages or actually change any model geometries."
That permission is worth using. The simulation is not a video you watch passively — turn the model while it plays, come round to the lingual, drop to the occlusal view. A collision that is invisible from the buccal is often obvious from above. "Run All Steps Repeatedly" loops it until you press the button again, which is the right mode for that kind of looking.
Two options change what you see. "Run Selected Teeth" simulates only the teeth you have picked, which is how you follow one problem tooth without the rest of the arch distracting you. "With tissue morphing" shows the soft tissue and deforms it with the teeth:
"If they don't follow the teeth, try the function Run All Steps again. If the problem persists, you can try to use the function Synchronize Tissue, which can be found on the system toolbar."
That toolbar button is "Sync Tissue".
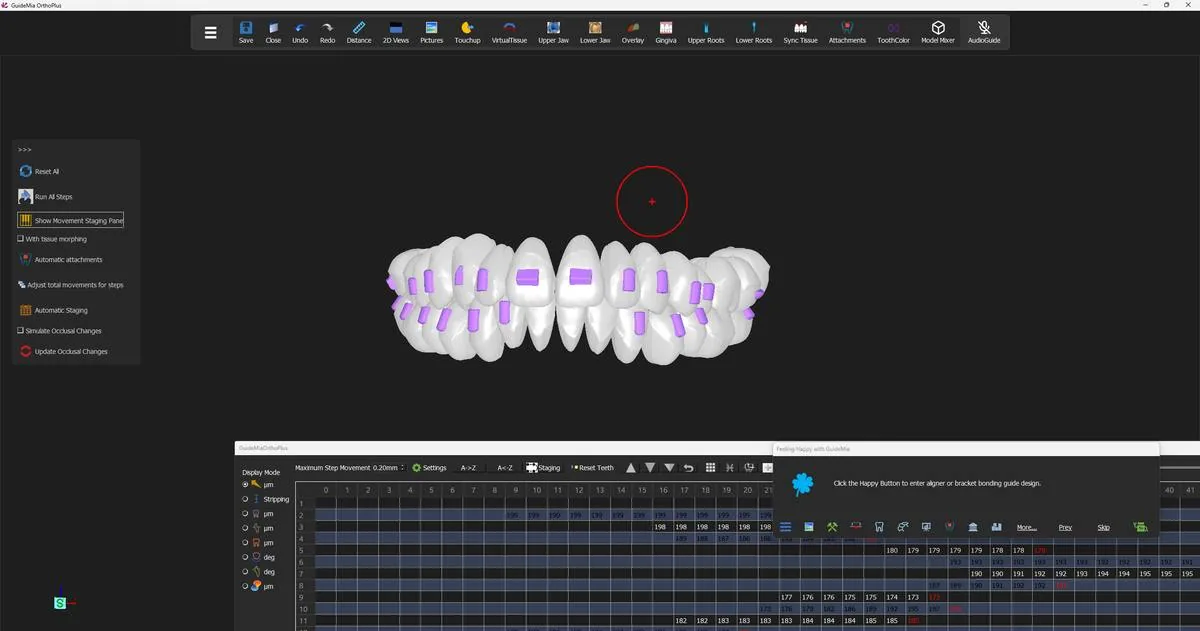 The plan playing back, with the model free to be turned while it runs.
Viewing one end from the other
Two controls on the staging toolbar let you see where a plan starts and where it finishes at the same time, which is the honest way to judge how much movement is actually being asked for:
- "A->Z" shows the final positions as the reference and sets the teeth back to the beginning.
- "A<-Z" shows the initial positions as the reference and moves the teeth to the final position.
They are the same comparison from opposite ends. Use "A->Z" when you want to see the journey ahead of the teeth as they are now, and "A<-Z" when you want to see how far they have come. Either way you get one arrangement solid and the other as reference, in one view, without stepping through.
"Reset Teeth" returns the selected tooth to an evenly distributed plan if you have been experimenting.
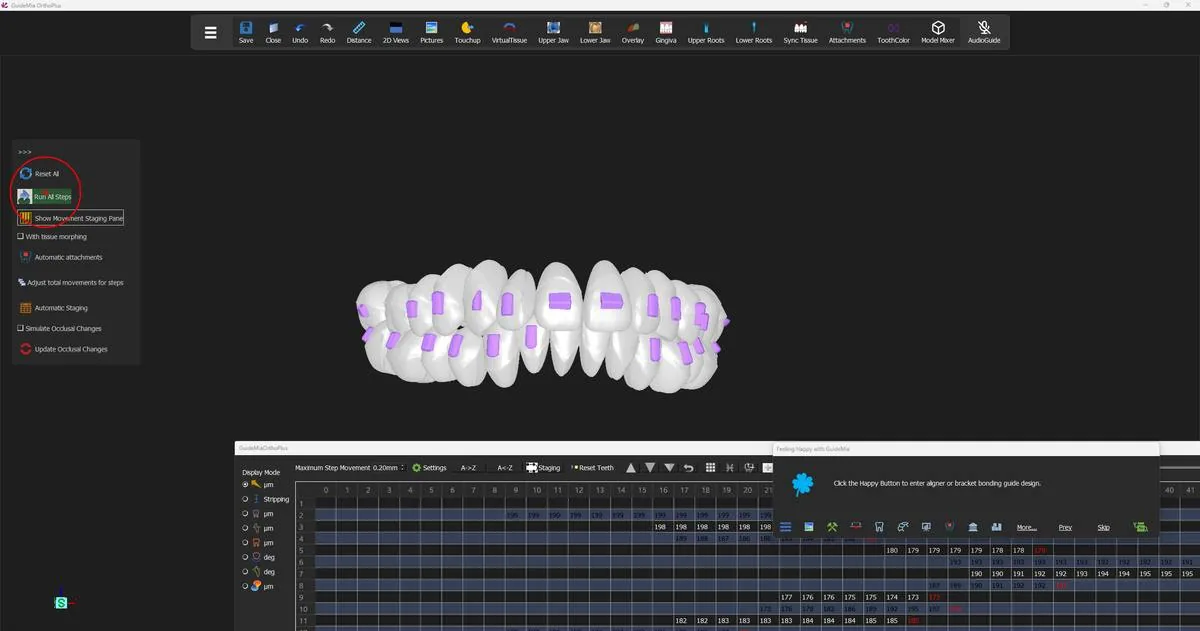 Running the simulation, with the staging toolbar and the movement table below.
The movement table
"Show Movement Staging Panel" brings up the table at the bottom of the window — the surface where the plan stops being a picture and becomes numbers you can edit.
"The rows are corresponding to teeth and the columns to the steps. When there is no movement for a tooth in a step, the step will show no number. When a step is defined as a keyframe, the text in the cell will be shown in red."
So the shape of the table is the plan. A row that is blank until column 9 is a tooth that does not start moving until step 9. A row that stops early is a tooth that finishes early. Blank cells are stillness, not missing data.
What the numbers are depends on the "Display Mode" radio buttons down the left of the panel, and the default is translation in micrometres:
"We use a few sample points on a crown model, calculate the translation values of the individual points in one step, and use the maximum value to represent the tooth movement amount. The values in the table are in the unit of micro meters."
A cell reading 198 is 0.198 mm of translation in that step — which, against a 0.20 mm per-step maximum, is a tooth moving as fast as it is allowed to. Rows sitting just under the limit for their whole length are the ones setting the length of the case.
The other display modes re-read the same plan through different questions, and three of them are the ones you will actually switch to:
- "Stripping" — when IPR can be performed on which teeth. "In general, IPRs are done at the beginning of a treatment, but sometimes the teeth may block each other, so the IPR has to be done at certain point in the treatment course when the teeth are no longer blocking each other." This is the mode that produces the clinical instruction sheet.
- "Attachments" — which teeth need attachments and when they need reorienting. By default they are all added at the beginning.
- Collision — where adjacent teeth interfere during the movement, step by step. Be ready to wait: "This will lead to the playback of all movements and collision calculation. It may take long time to complete the calculation."
Selecting a cell drives everything else. The tooth number and step number on the panel follow it, and the 3D views jump to that step — so clicking a red cell puts the model in front of you in exactly the position that cell describes.
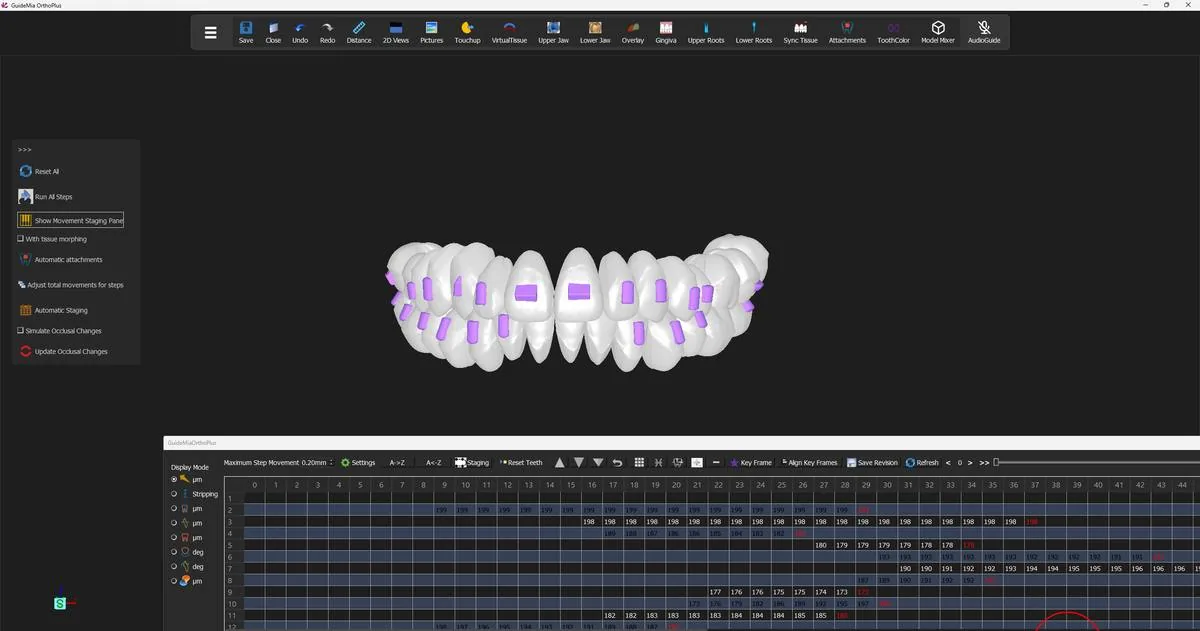 The movement table: rows are teeth, columns are steps, red text marks key frames.
Key frames, and the quick route through this page
A key frame is a position a tooth must pass through:
"Key frame refers to a tooth position where the tooth will have to be during the movement process."
They are how you resolve a collision that even distribution created. If two teeth would clash halfway through, you pin one of them to a position that gets it out of the way, and the movement either side of that pin re-plans around it. Moving a tooth at a key frame changes how it travels, not where it ends up.
"Automatic Staging" does this across the whole case:
"This is an advanced feature to rerun all the tooth movements and adjust tooth positions in the middle of the simulation so that all the collisions will be eliminated. As a result, some steps may be added to the entire movement plan, and all the teeth will have their key frames set. ... In a quickest workflow, use the Reset All to plan all movements and use this button the finalize the plan."
That last sentence is the recommended path through this whole page: "Reset All" to build the sequence, "Automatic Staging" to make it collision-free. Expect the step count to rise — resolving a collision costs steps, and a plan that gained a few is a plan that found something.
The box beside it, suffixed "Steps/Stage", sets how often collision checking happens: "The smaller the number is, the more collision checking the system would do. Normally you would not need to change the settings, especially, to a bigger value."
Judging the plan
Before you leave this page, three checks.
Watch the whole simulation at least once, from more than one angle. You are looking for a tooth that travels through a neighbour, a tooth that lurches rather than moves smoothly, and anything that arrives at its final position early and then sits still for twenty steps for no reason.
Read the table for shape, not just values. Rows that all start at step 0 and all end together mean nothing has been sequenced — fine on a simple case, suspicious on a crowded one where some teeth clearly need space made before they can move.
Check the stripping mode against what you planned in step 8. The IPR you allowed becomes an instruction with a step number attached. If it is scheduled for step 14 rather than the beginning, that is the software telling you the teeth are blocking each other until then — worth knowing before someone tries to perform it at the first appointment.
"Save Revision" stores the staging plan as a revision, so a plan you are happy with can be kept while you try a different one.
Where you are now
The case is a sequence. Every tooth has a position for every step, the movements sit inside the per-step limits, key frames hold the plan clear of collisions, and the IPR is scheduled against the steps where it can actually be done. The Happy Button now reads "Click the Happy Button to enter aligner or bracket bonding guide design." — the case has everything it needs to be turned into arch models and aligners, which is the next step.
The Movement Planning panel and the staging toolbar carry more than the demo uses:
| Control | What it does |
|---|---|
| "Reset All" | Rebuilds every tooth's steps; not reversible |
| "Plan from step" | Replans only the steps after a nominated step |
| "Upper Steps" / "Lower Steps" | The maximum step count per jaw; editable |
| "Run All Steps" | Plays the whole simulation |
| "Run All Steps Repeatedly" | Loops it until pressed again |
| "Run Selected Teeth" | Simulates only the picked teeth |
| "With tissue morphing" | Shows and deforms the soft tissue during playback |
| "Adjust total movements for steps" | Spreads the load so fewer teeth move at once |
| "Automatic Staging" | Sets key frames across the case to eliminate collisions |
| "Steps/Stage" | How often collision checking happens |
| "Show Movement Staging Panel" | Shows and hides the movement table |
| "Maximum Step Movement" | The per-step translation limit, from the movement profile; editable in Settings |
| "Settings" | The movement profile itself |
| "A->Z" / "A<-Z" | One end of the treatment shown as reference while the teeth sit at the other |
| "Staging" | Opens the stage planning tool |
| "Reset Teeth" | Evenly redistributes the selected tooth's movement |
| "Key Frame" | Marks the selected steps as key frames |
| "Align Key Frames" | Gives several teeth a shared key frame, defining a stage |
| "Insert Step" / "Delete Step" | Adds or removes a step at the selection |
| "Adjust Movement Amount", "Eliminate Collisions", "Move tooth at step" | Fine control on the selected cells |
| "Save Revision" | Saves the staging plan as a revision |
| "<", ">", ">>" and the step slider | Move the model through the steps by hand |
Two more things the table itself can do. Right-clicking a cell opens the fine-control functions for that tooth and step. And cells can be dragged:
"For example, if a tooth has movements in step 2 to 10, you drag the cells from 7 to 10 to cell 15, it means the tooth will not move between step 7 and 15."
That is the quickest way to hold a tooth still while its neighbours get out of the way, and it is done entirely by selecting cells and dragging them.
For finer work than the table allows, the "Stage Planning" dock — opened by "Staging" — offers a before/after pair for each movement type ("Translation", "Rotation", "Intrusion/Extrusion", "Buccalingual Movement" [sic], "Mesialdistal Movement", "Arch Expansion", "Protrusion/Retraction", "Torque"), letting you push a whole class of movement before or after a chosen step. That is how you say expand first, then align, rather than doing everything at once.
Attachment scheduling lives on the same toolbar: "Start Attachment", "End Attachment", "End Attachment Intermittent Mode" and "Reset Attachment Staging" become available when the tooth selected in the table has an attachment, and set the steps over which it is active.